I had to replace one...it's very easy compared to other regulators on other vehicles I've done.
The hardest part is getting the door panels off without breaking a clip. Here's a post I did on another forum (I apologize in advance...some of the pics are pretty large):
------------------------------------
Well...putting the windows up last night after my ride from work and what do I hear? "SNAP" and "CRUNCH, CRUNCH CRUNCH."
The right rear window was only halfway up and just didn't wanna go any further, so:
Step 1: Door panel off (without breaking a single clip...and those with the original H2 interior know that's no small feat)
Step 2: Door insulation off
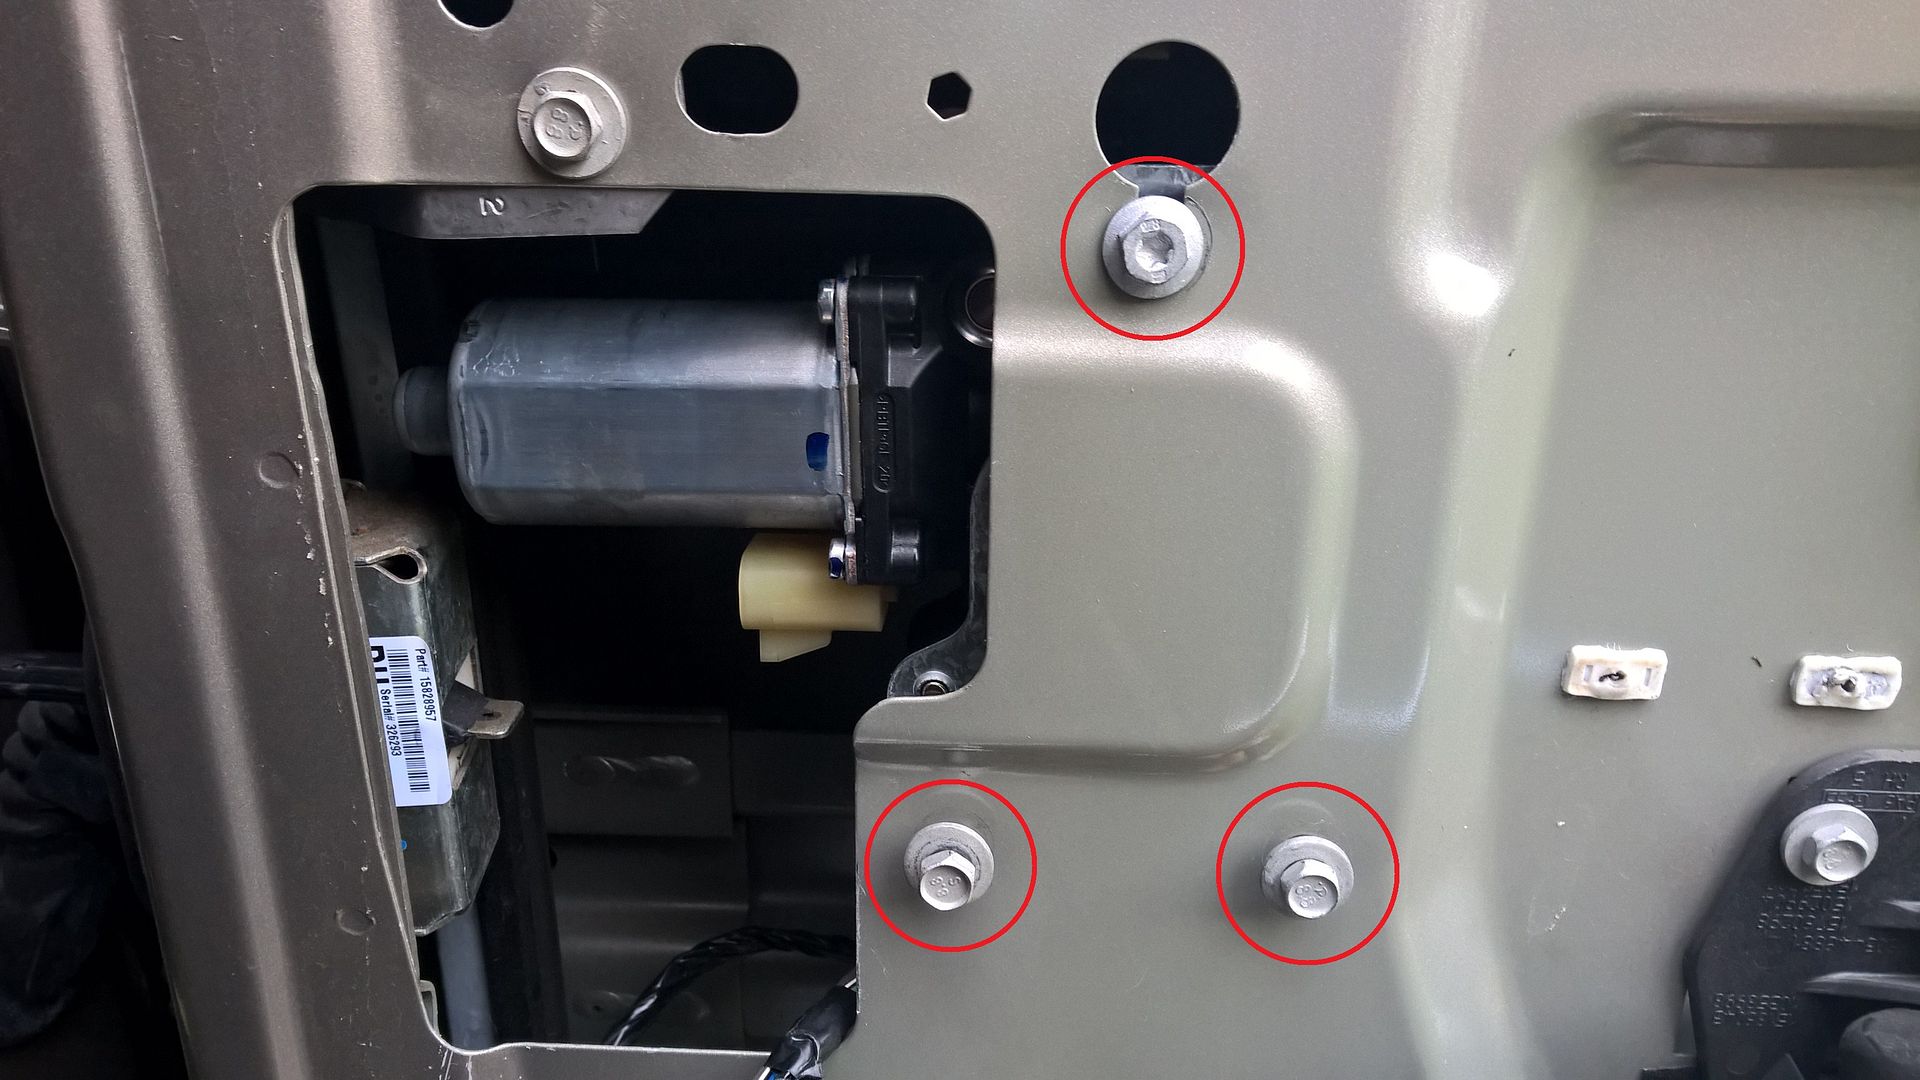
Step 3: Removed the three bolts that hold the window motor in place to get a good look at the cable
This revealed that the cable was pinched between the spool casing and the metal cap that covers it (shoulda took a pic). I worked the cable free and tested the motor, but the cable still wouldn't budge.
Step 4: Separated the spool casing from the motor.
This revealed that the cable was all tangled up around the spool.
Step 5: Manually pushed the window up/closed and zip tied the guide mechanism in place.
Step 6: Ordered PN 15771354 from gmpartsdirect.com ($222.70 shipped)
Step 7: Waiting on UPS
I'll pick up with Step 8 (with pics) once the part arrives in case anyone else needs some info about the procedure...to make them feel all warm, fuzzy and confident before tackling the job. It looks like it will be a piece of cake to make the swap there's plenty of large openings to get access inside the door and the regulator itself seems very simple compared to others I've replaced.
SIDE NOTE: It appears that the new regulator also includes a new motor...kinda wish I coulda just got the regulator w/o motor, that woulda probably cut the price in half.
------------------------------------
REGARDING THE PANEL REMOVAL: here's some pics...this will definitely help you identify where to apply pressure when trying to get the rear panel removed without breaking anything.
The little piece of side trim beside the window is the first thing that needs to come off...three clips.
Then the bezel around the handle needs to come off...no brainer...one Phillips head and slide it over the handle:
Now you're ready to take the whole panel off. The green circles in the image indicate where there are two 10mm bolts that need to come out...the rest (in red) are the clips. I found that it's best to start with a clip-removal tool at the opening left after you removed the first trim piece...only because this clip is completely visible and from there you can work around. I actually DIDN'T find the clip-removal tool as useful as I thought on the remaining clips and ended up using an extremely large (EXTREMELY large...see image) flat-head screw driver to reach in and pry most of the other clips away.
NOTE: The two yellow clips in the middle at the top are the hardest to remove...without breaking something. This is where the extremely large screwdriver came in CLUTCH, 'cause I could reach up from the bottom of the panel all the way to the top find a good leverage point.
REGARDING THE OLD REGULATOR:
My cable got bound up (caught between the metal and plastic) here:
When I pulled the regulator's spooling section apart, the cable was all twisted up here:
...and here's the spooling mechanism separated from the motor:
The motor comes out very easily by removing these three bolt and sliding it through the hole in the door panel:
It appears that the regulator track comes out by removing these two bolts (but I will confirm in a follow-up post):
--------------------------------------------
REGARDING THE NEW REGULATOR AND INSTALL:
The new regulator came Friday...did the install in about 30 minutes, but I already had the door panel off).
Once you get to the part where you're ready to make the swap you'll want someone to help hold the window in the full upright position while you remove the regulator and install the new one.
Remove the three bolts circled in
RED, loosen the two bolts circled in
GREEN...that's all that holds the motor and regulator in place. The top bolts (
GREEN) do not need to come out as they will fit through the larger hole openings when you slide the regulator up inside the door. Make certain that your helper has a good grip on the glass and loosen the bolts circled in
PURPLE; this is the clamp that holds the window in place. One of the bolts will need to be accessed via the hole in the sheet metal indicated by the
PURPLE arrow.
Then you simply slide the regulator up and out the large opening in the door and reverse the directions to put the new one in. Easy.
SIDE NOTE: I found that my problem may have been caused by a short in the door panel switch. When I finished my install and connected the switch to the harness, the window motor started running immediately, trying to put the window down. I swapped in the switch from the left side and the problem went away.
When I disassembled the original switch I noticed a quantity of what appeared to be dielectric grease inside the switch. There was a small section between two of the prongs which appeared blackish as if it had caused a short. I don't quite know how that works, but I thoroughly cleaned the switch, reassembled and it worked fine.
My best guess is that the switch shorted out the day the regulator broke and must have been trying to force the window down during my evening commute until the plastic guides/collars on the regulator eventually snapped under the force. Here's a close up of the new spool...the plastic collars on both ends of mine had broken free and apparently caused the cable to get all chewed up by the motor.
Hope someone finds this helpful.