• Welcome to H4O! For a reduced ad experience, please login or register with the forum.

Boulder Accessories Bumper and Winch install "step by step"

M

MUTAINT

Guest
WOW, first Tech Install! I'm going to cut and paste so some of the dates and names will not be changed!!!:D


OK, this is my first "how to" so be a little easy on me. I've also had a lot of beers due to St.Pats day so spelling will be a little off!
Before:
2009_0315bumper-install0001.jpg

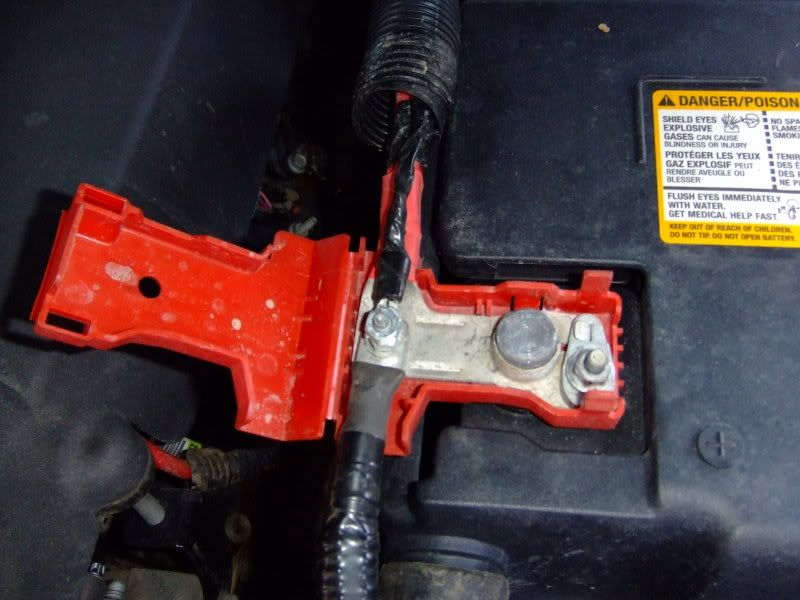
Disconnect batter terminals (2 10mm):
2009_0315bumper-install0002.jpg

2009_0315bumper-install0003.jpg

Remove D rings (2 24mm):
2009_0315bumper-install0004.jpg

Remove D ring support brackets (2 18mm):
2009_0315bumper-install0005.jpg

Make sure the rear skid plate bolts are loose (2 13mm):
2009_0315bumper-install0006.jpg

Remove the front skid plate bolts (2 13mm):
2009_0315bumper-install0007.jpg

Slide the skid plate toward the back of the rig and remove:
Remove the 08/09 support bolts (2 10mm):
2009_0315bumper-install0008.jpg

Remove plastic retainers, pry with a flat screwdriver (6 of them):
2009_0315bumper-install0010.jpg

2009_0315bumper-install0011.jpg

2009_0315bumper-install0009-1.jpg

Remove lower bumper bolts (4 15mm):
2009_0315bumper-install0013-1.jpg

2009_0315bumper-install0014-1.jpg

Bumper will come off if tilted toward the rig (no grill removal is nessary, also don't forget to disconnect the fog light wiring on both lights):
2009_0315bumper-install0015.jpg

Now you can remove the lower support 08/09, slide it forward (see remove the 08/09 support):
2009_0315bumper-install0016-1.jpg

Remove factory fog light pods from old bumper (6 10mm):
2009_0315bumper-install0020.jpg

2009_0315bumper-install0019.jpg

Bumper and 08/09 support:
2009_0315bumper-install0019-1.jpg
 
Last edited by a moderator:
M

MUTAINT

Guest
Install fog light pods on the BA bumper using the supplied bolts and nuts (6 11mm). I had to ream out some of the stock fog light holes to accept the larger bolts, a rat tail file worked wonders:
2009_0315bumper-install0021.jpg

2009_0315bumper-install0022.jpg

2009_0315bumper-install0023.jpg

Remove the winch bolts (4 15mm), I used duct tape to keep the nuts in place:
2009_0315bumper-install0038.jpg

NOW IT"S TIME TO CUT! Some of the plastic shroud has to be cut away in order for the winch assembly to fit.
This is what it looks like before cutting:
2009_0315bumper-install0024.jpg

Mark your cut lines and cut:
2009_0315bumper-install0026.jpg

2009_0315bumper-install0028.jpg

This is what it should look like after you cut and reomove this piece (use a Dremel or ti snips):
2009_0315bumper-install0029.jpg

2009_0315bumper-install0030.jpg

Next mark, cut and remove the plastic "nose" looking piece:
2009_0315bumper-install0033.jpg

2009_0315bumper-install0031.jpg

2009_0315bumper-install0032.jpg

This is what is should look like after the removal:
2009_0315bumper-install0034.jpg

2009_0315bumper-install0035.jpg

Get the bumper close to the rig. Run the pos. and neg. wires from the winch to the inside of the engine compartment. Please at least use some loom or protection on the pos. wire if not both!!!!!
2009_0315bumper-install0037.jpg

Next get a floor jack and another person to help with the bumper lift. I got creative since I had no help! (I say get some help it will go a lot smoother and you will have less chance to visit the emergency room)
2009_0315bumper-install0036.jpg

2009_0315bumper-install0039.jpg

Lift the bumper into place (don't forget to slide the winch over to the driver side to make it easier to get the passenger side D ring support mounts past the winch)
2009_0315bumper-install0017.jpg

The rest is just "point and shoot". Raise the bumper up enough to match the rear frame mounts. Place a bolt (supplied) 1 in each side to hole the bumper in place.
Line up the front frame mounts and replace with the stock bolts (the kit comes with one shorter bolt, use this on the passenger side inside spot so the bolt won't hit the winch.
When placing all of the frame bolts (4) and D ring support bracket bolts leave them loose so you can adjust the gap between the bumper and the grill.
Adjust for an even gap. Tighten all the bolts now!
 
Last edited by a moderator:
M

MUTAINT

Guest
Now, secure all of your wires and connect the battery terminals, pos and neg from the winch (10mm).
2009_0315bumper-install0041.jpg

2009_0315bumper-install0042.jpg

2009_0315bumper-install0040.jpg

This bumper has a great fit and is nice and close to the grill. If I missed anything please let me know. I have so many pix of the install, I hope I included everything. I will be installing lights soon, i'n not sure what kind or how many yet. I'm leaning toward 3 on the bumper all driving lights or 2 fogs and a center driving light?????

After (my buddy finally showed up after the bumper was installed, just in time for the after photos):
2009_0315bumper-install0043.jpg

2009_0315bumper-install0044.jpg

2009_0315bumper-install0045.jpg

D rings at attention!
2009_0315bumper-install0046.jpg

2009_0315bumper-install0047.jpg

2009_0315bumper-install0048.jpg

P.S. Sorry Chris B. I couldn't wait for us to install it this week. I was like a kid on Christmas day with a new race track. GOTTA SET IT UP NOW!

DRINK MANY BEERS AND THINK ABOUT THE MANY USES FOR YOUR NEW BUMPER AND WINCH!
 
Last edited by a moderator:

Bigunit

Hammer Down!
Staff member
Messages
6,561
Location
Arizona
MU or Brodie, would you recommend welding the RD frame plate supports for more support for the BA bumper or are they not needed because of the strength and weight distribution of the BA bumper?
 
M

MUTAINT

Guest
Both of ours have the frame plates welded to them. I wouldn't install a winch bumper or winch plate without them. Just ask F5 about them.
 

Bigunit

Hammer Down!
Staff member
Messages
6,561
Location
Arizona
Anyone have a copy of the original BA install instructions that you could send me. I just want to see if the instructions listed the original hardware (nuts & bolts) and would like to see what came in the box as the original install hardware to make sure I have everything. Thank ypu & any help would be greatly appreciated.
 
M

MUTAINT

Guest
Can't help right now. All my Docs are in my computer which is being "fixed" right now and the org. docs are in storage.
 

Green 1

Matty Patty Pookie Bear
Messages
1,149
Location
Ferris,Texas
I have installed one of these before. Good write up. One thing I did not do was take the winch bolts out. You can raise the bumper and move the whole bumper over a ouple of times as you raise it and it kepps you from having to take the winch loose from the bumper. Every write I have seen on this says to remove these bolts but it is not necassary and it saves time as the bolts are a pain to get in after the bumper is in place.
 

Justanotherhemi

Active Member
Messages
37
Location
Mission,Texas
I know its a supper old threat but....I would like to thank Mutant on the great write up. I took on the task of replacing my fog light assemblies and this made what seemed impossible a 2 hour wrench job. Again Thank You
 

mavrikjc

Well-Known Member
Messages
82
Location
Dallas, TX
Just wanted to do a quick update with some pics from my afternoon mounting supersapper-rpm's BA Winch Bumper on my 2009 H3T Alpha Adventure...

BEFORE
IMG_20131228_141356041.jpg


AFTER
IMG_20131228_163358592.jpg

For my 2009 H3T Adventure I noticed a few things during the process.


1) I could only find 4 (2 each side) plastic retainer clips on the 2009 H3T Alpha

2) The 2008/09 support bar won't be going back on after you put the BA Bumper on.
IMG_20131228_150313605.jpg

3) The stock 2009 bumper has the nuts welded into the outside left/right brackets so you will not be able to use your original OEM bolts to attach the BA Bumper. This wasn't a big deal though I'll probably upgrade to a little heavier hardware than what I had laying around the garage.
IMG_20131228_164124038.jpg


Otherwise, thanks MUTAINT for the AWESOME How-To guide that let me knock this wrench job out in about 3 hrs.
 

Attachments

  • IMG_20131228_150313605.jpg
    IMG_20131228_150313605.jpg
    443.5 KB · Views: 437
Top