

H32NV
Well-Known Member
- Messages
- 319
- Location
- Golden, CO
Started my new tires project the other day. Picked up some 35" MTR's from Discount Tire, but was told that they would not mount them to my beadlocks(I expected this response). So it was back to my garage to perform the replacements, and no amount of soapy water seemed to help get the rims apart any easier!
After lots of hammering and prying, the outer rim finally came off, however the bolts underneath the rim scratched and marred up the O-ring sealing surface. I'm in trouble now, mounsting a tire to this would surely leak...I needed a friend with much cooler tools than I have in my garage, a simple hand file will not take care of this.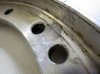
So I went to my friend Lee's Machine Shop called Davidson Precision Machine. He is in town here in Flagstaff and is an excellent machinist. He first went into the trade as a manual mill and lathe machinist, then went to college and studied drafting and programming, and then came back to being a machinist and ended up starting his own shop. Business has been very good for him, a company in town called Gore Medical has had a relationship with him in the past, and their shop manager started sending him parts straight away. The influx of invoices allowed him to start to purchase expensive CNC milling centers and lathes, which he has had customized to his liking, and the business keeps coming. Previously Gore has had to ship most of their work down to Phoenix or out of state and some overseas, because the type of machining required is often high-tolerance work on hardened stainless steels that are used in the medical device industry. Its great to see a homegrown shop and a hardworking citizen see such success without having to outsource. Gore very much likes that he is in Flagstaff because if they have a new version of a part or want to 'check up on things', they can just swing by his 'open-door' shop on lunch-hour and shake the man's hand that is making their parts. The crown jewel of his shop is a HAAS VF2SSYT Precision CNC Vertical Milling Center, its a 2012 model new from the factory and was ordered with the high-sensitivity upgrade. The positional accuracy of the cutting tool is 0.00001" on this machine, that's about a hundred times less than the diameter of the average human hair!
We wrote a quick program to skim the surface of the rim to clean it up. All that is left to do is enter the position of the part into the CNC's computer controlled coordinates system, by way of the wireless calibration probe that mounts into the chuck for the cutting tools.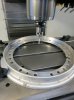
Lapping the surface at 12,000 RPM with a 1/2" End-mill. This manufacturing technology is amazing.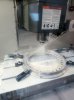
Flawless surface finish. Im back in business!
And at 3AM everything finally came together. It helps to have friends.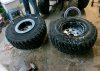
After lots of hammering and prying, the outer rim finally came off, however the bolts underneath the rim scratched and marred up the O-ring sealing surface. I'm in trouble now, mounsting a tire to this would surely leak...I needed a friend with much cooler tools than I have in my garage, a simple hand file will not take care of this.
So I went to my friend Lee's Machine Shop called Davidson Precision Machine. He is in town here in Flagstaff and is an excellent machinist. He first went into the trade as a manual mill and lathe machinist, then went to college and studied drafting and programming, and then came back to being a machinist and ended up starting his own shop. Business has been very good for him, a company in town called Gore Medical has had a relationship with him in the past, and their shop manager started sending him parts straight away. The influx of invoices allowed him to start to purchase expensive CNC milling centers and lathes, which he has had customized to his liking, and the business keeps coming. Previously Gore has had to ship most of their work down to Phoenix or out of state and some overseas, because the type of machining required is often high-tolerance work on hardened stainless steels that are used in the medical device industry. Its great to see a homegrown shop and a hardworking citizen see such success without having to outsource. Gore very much likes that he is in Flagstaff because if they have a new version of a part or want to 'check up on things', they can just swing by his 'open-door' shop on lunch-hour and shake the man's hand that is making their parts. The crown jewel of his shop is a HAAS VF2SSYT Precision CNC Vertical Milling Center, its a 2012 model new from the factory and was ordered with the high-sensitivity upgrade. The positional accuracy of the cutting tool is 0.00001" on this machine, that's about a hundred times less than the diameter of the average human hair!
We wrote a quick program to skim the surface of the rim to clean it up. All that is left to do is enter the position of the part into the CNC's computer controlled coordinates system, by way of the wireless calibration probe that mounts into the chuck for the cutting tools.
Lapping the surface at 12,000 RPM with a 1/2" End-mill. This manufacturing technology is amazing.
Flawless surface finish. Im back in business!
And at 3AM everything finally came together. It helps to have friends.
Attachments

Last edited:


