
I remember when that Power Wagon guy came on CHO. He had been banned once but he signed up under a new user name. It took <24 hours to get banned again. That guy is always trying to prove Power Wagons are better than Hummers. Logic has no effect on morons. He was the only guy I ever put on my blocked list.

-
Welcome to H4O! For a reduced ad experience, please login or register with the forum.
You are using an out of date browser. It may not display this or other websites correctly.
You should upgrade or use an alternative browser.
You should upgrade or use an alternative browser.
Hutchinson Beadlock Wheels
- Thread starter Portager
- Start date

06 H3
a.k.a. "The Jackal"
- Messages
- 9,496
- Location
- Meridian, ID
He probably came over to the hummer forums because all the power wagon forums already banned his sorry ass
Sent from my DROIDX using Tapatalk
Sent from my DROIDX using Tapatalk


H32NV
Well-Known Member
- Messages
- 319
- Location
- Golden, CO
I could never get fake beadlocks only for the fact that when someone asks if they are real I would have to tell them they are fake or lie and I would have issues lying, I feel too guilty....I have a strong conscious lol
I really want these beadlocks but price and weight are a concern. I have alot of weight and am trying to keep from adding more especially if I bring the trackwidth out. I think these will work well for you though portager.
On stock rims, Ive lost the bead twice on the OEM Duelers, I was down at 18psi and wheeling with Alec at the time on Spring Creek in Idaho Springs, CO... Also the time that I grenaded my first front diff in the Rock Garden. It totally sucks to lose a bead offroad, there is a gasoline trick that Ive seen work a few times, and seen not work a few times...Alec happened to have a PowerTank with about 300psi outlet pressure, and this with a combination of lots of hands was able to set the bead again so I could fill the tire with my "dinky" 120psi system. I also would not get fake beadlocks. I mean, whats the point? For most of us here I think we all want function over form. I got the Hutchinson Beadlocks, love them, never lost a bead even at 12psi, and I only keep one spare on the tire carrier. It was a good point to bring up moment of Intertia, kudos.
Thanks for the input. It is good to hear from someone who has lost a bead on the trail. I never have, but that could be because I'm scared to air down too far!
Most (not all) my modifications have been intended to reduce the chances of my wife and I getting stranded out in the desert. I think the beadlocks are a good insurance policy. I'd gladly spend $2K now to avoid having to reseat a bead on the trail. Fortunately I do has a CO2 tank which would help, but still that could be a serious problem especially if I off roading alone.
Most (not all) my modifications have been intended to reduce the chances of my wife and I getting stranded out in the desert. I think the beadlocks are a good insurance policy. I'd gladly spend $2K now to avoid having to reseat a bead on the trail. Fortunately I do has a CO2 tank which would help, but still that could be a serious problem especially if I off roading alone.
H32NV
Well-Known Member
- Messages
- 319
- Location
- Golden, CO
ohhh just want until you install them
srsly. installing the hutchinsons. Just be calm. Prepare yourself mentally. Have a drink. Its going to take a while.
If you do get them, use vaseline or another non-solvent containing(aka viton material compatible) gel to help keep the O-ring seal in place while you hammer on the front face of the rim to get it down. We were able to seat the inner wheel via a couple 2x4's and Alec's Winch and bumper and a pulley system(its a tight fit initially). Then use a full-length threaded Hex head machine bolt, about 6 inches will do, so that you can use an impact driver to drive down the front ring into the inner wheel enough to get the circumferential bolts secured. This is a tricky process, drive down each bolt 1/2" or so at a time so that you dont get the ring too uneven and gouge out the threaded holes that you are using to help compress the two pieces together. right before you drive down the circumferental stud bolts, check to be sure that the O-ring is still in its groove, it has a tendency to fall out. And be sure to fill the tires to 40psi or so and do a leakdown test on them, and spray with soapy water all around the rim joints and inflation valve. I had a slow leak only on one rim and it was a pain to fix. as i remember I had to re-seat that O-ring about 4 times to get it to hold.
Happy Wheeling!
***EDIT*** - Also, while using that impact wrench to turn the full-length threaded hex machine bolts, use two washers inbetween the bolt and the rim. This will keep the heads of the Hex bolts from chewing up the paint on the front ring.
srsly. installing the hutchinsons. Just be calm. Prepare yourself mentally. Have a drink. Its going to take a while.
If you do get them, use vaseline or another non-solvent containing(aka viton material compatible) gel to help keep the O-ring seal in place while you hammer on the front face of the rim to get it down. We were able to seat the inner wheel via a couple 2x4's and Alec's Winch and bumper and a pulley system(its a tight fit initially). Then use a full-length threaded Hex head machine bolt, about 6 inches will do, so that you can use an impact driver to drive down the front ring into the inner wheel enough to get the circumferential bolts secured. This is a tricky process, drive down each bolt 1/2" or so at a time so that you dont get the ring too uneven and gouge out the threaded holes that you are using to help compress the two pieces together. right before you drive down the circumferental stud bolts, check to be sure that the O-ring is still in its groove, it has a tendency to fall out. And be sure to fill the tires to 40psi or so and do a leakdown test on them, and spray with soapy water all around the rim joints and inflation valve. I had a slow leak only on one rim and it was a pain to fix. as i remember I had to re-seat that O-ring about 4 times to get it to hold.
Happy Wheeling!
***EDIT*** - Also, while using that impact wrench to turn the full-length threaded hex machine bolts, use two washers inbetween the bolt and the rim. This will keep the heads of the Hex bolts from chewing up the paint on the front ring.
Last edited:

In my case I did not do any hammering on mine for fear of breaking or warping something. Like Daddy said "don't force anything" "use the right tool for the job"
I machine mounted mine for the first bead and there was enough flex in the sidewall of the 315's to just push down on the ring which just drops on and pressed down slowly until I could start the bolts. I guess it depends on the tire. These are rated 10 ply with a triple side wall.
Just fixing a leak in the rim seal with a mounted tire, the ring can be removed easily and replace the O'ring. Of course letting all the air out first (even says that on the rim) One I got had a slow leak and it did not take me very long to just replace that O'ring and the Vaseline applied liberally holds it in place. Obviously with the inside bead still holding it is alot easier to do this than the original mounting. I found that standing the whole mess up got me closer to engaging the bolts than laying down.
Having a friend with a tire machine and the patience to mess with it helps.
I had them re-balanced and removed about half those weights and put some on the back but not that many.


There are also some non-threaded holes thru both pieces where if needed the long bolts could be pulled thru and then the nuts used on top where you could see them and not take a chance messing up the threaded holes in the wheel.
I machine mounted mine for the first bead and there was enough flex in the sidewall of the 315's to just push down on the ring which just drops on and pressed down slowly until I could start the bolts. I guess it depends on the tire. These are rated 10 ply with a triple side wall.
Just fixing a leak in the rim seal with a mounted tire, the ring can be removed easily and replace the O'ring. Of course letting all the air out first (even says that on the rim) One I got had a slow leak and it did not take me very long to just replace that O'ring and the Vaseline applied liberally holds it in place. Obviously with the inside bead still holding it is alot easier to do this than the original mounting. I found that standing the whole mess up got me closer to engaging the bolts than laying down.
Having a friend with a tire machine and the patience to mess with it helps.
I had them re-balanced and removed about half those weights and put some on the back but not that many.
There are also some non-threaded holes thru both pieces where if needed the long bolts could be pulled thru and then the nuts used on top where you could see them and not take a chance messing up the threaded holes in the wheel.
Last edited:
H32NV
Well-Known Member
- Messages
- 319
- Location
- Golden, CO
Just to clarify, HAMMERS werent involved, although it was about that hard to get my Duratrac's mounted into the beadlocks. Full-length lag screws did the job smoothly, but certainly could not be done by hand or with a rubber mallet. Discount tire also attemped but could not mount one side of the tire either, so we "pulled" it into place with 2x4's a tree-strap and a winch. I think pics are over on HXC if that place still exists..
I remember those pics of Alex Jeep with the wheel on the bumper. I always wondered why you did not turn it around so you could get to the bolts. Anyway however it works out it's definitely a bit of work, especially the first one. I did note to self if a tire was messed up on a trail I could pull that ring and stick a patch/boot inside the tire if a plug was not enough. It would be better than trying to remount a tire. Even using a ratchet strap around the tire you really need a large volume of air rapidly and of course large flat pry bars and help. I have seen the explosive method and I think I will pass on that.
That's why I also carry one of these kits. This one is by Powertank.
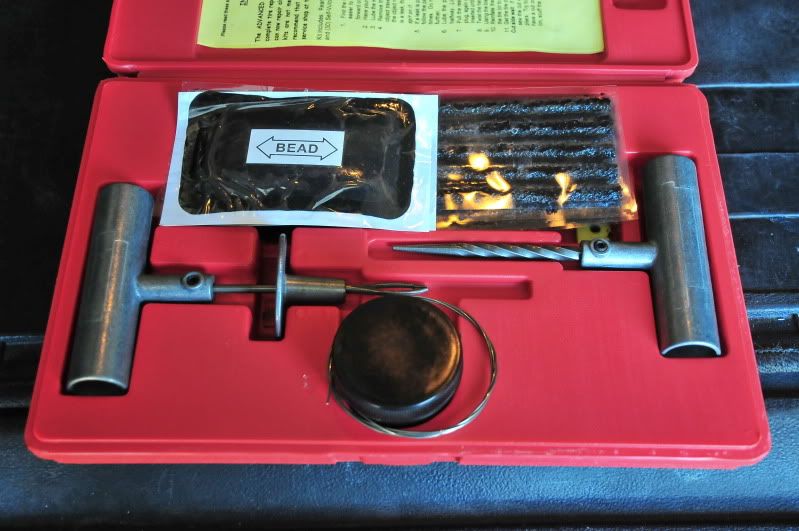
That's why I also carry one of these kits. This one is by Powertank.

HUMMER INVESTMENTS
[o O IIIIIIII O o]
- Messages
- 3,518
- Location
- Black Hawk, SD
Post up pics once done!:thumbs:

bebe
Moderator
- Messages
- 1,375
- Location
- Dayton, NV
Chris - COG is nothing more than math. Find someone who has some pads and weigh your rig with and without the rack. The numbers tell the story.
LOL one more tip - Use paragraphs when you change subjects :giggle:
LOL one more tip - Use paragraphs when you change subjects :giggle:
Last edited:
06 H3
a.k.a. "The Jackal"
- Messages
- 9,496
- Location
- Meridian, ID
Chris - COG is nothing more than math. Find someone who has some pads and weigh your rig with and without the rack. The numbers tell the story.
LOL one more tip - Use paragraphs when you change subjects :giggle:
I try reading my posts months later and wonder WTF was I talking about...I get confused too.
I will have to try that, I think castaic(the next town over) probably has some scales seeing the town is a truck stop.
bebe
Moderator
- Messages
- 1,375
- Location
- Dayton, NV
No the pads are 10 inches square. There are 4 of them and they also calculate COG.

Let me see if I can find some place local for you to take it too.
SMP Fabworks in Sylmar. I'll call him in the morning - get you set up
Let me see if I can find some place local for you to take it too.
SMP Fabworks in Sylmar. I'll call him in the morning - get you set up
Last edited:
06 H3
a.k.a. "The Jackal"
- Messages
- 9,496
- Location
- Meridian, ID
No the pads are 10 inches square. There are 4 of them and they also calculate COG.
Let me see if I can find some place local for you to take it too.
SMP Fabworks in Sylmar. I'll call him in the morning - get you set up
your the best! thanks bebe!
If SMP fabworks doesnt have it Off road Evolution might...I will just have to suck up my pride first...rigs like yours seem to be the norm around there
Last edited:
No the pads are 10 inches square. There are 4 of them and they also calculate COG.
Very cool, but I think to determine COG you need to use the scales on a slope. You don't need to know the slope if you assume even weight distribution or weigh it pointing both ways, but you need to know the wheelbase or how far apart the scales are. If they don't charge too much do it aired up and then aired down.
Chris; How much does your rack weigh? I thought the spare weighed more than the rack.
I have been thinking of creating a spreadsheet that would calculate COG change based on adding or subtracting a weight at a certain height. If you get the COG with and without the rack, or even with and without the spare, and the height of the rack/spare, I could use that to check my math. I could also calculate roll-over angle if you entered the wheelbase. One thing I've been pondering is do you assume the normal force is applied at the center of the tire or the outer edge? I think the center would be more conservative, but the outer edge is probably more precise.
06 H3
a.k.a. "The Jackal"
- Messages
- 9,496
- Location
- Meridian, ID
I don't wanna hijack ill make a COG thread. In the mean time I am not sure on the weight of the rack but I will check on the gobi site or ask tim if its not available on the site. I would say the rack weighs more but one plus is that the weight from left to right is almost even. The tire is dead center. The hi lift is 30 lbs and the awning is about 12-15 so I could add my shovel and axe mount and balance it even more or just buy the shovel and axe that folds up and store it in the back.
I think a spreadsheet of COG would be great. It would be beneficial to others when making mods decisions and I could even help out with that if u want. You do the math and I get the weight of things?? Lol
One other thought was that when I do bumpers it should help a bit because that puts weight lower and can help a little bit too.
Sent from my DROIDX using Tapatalk
I think a spreadsheet of COG would be great. It would be beneficial to others when making mods decisions and I could even help out with that if u want. You do the math and I get the weight of things?? Lol
One other thought was that when I do bumpers it should help a bit because that puts weight lower and can help a little bit too.
Sent from my DROIDX using Tapatalk
HUMMER INVESTMENTS
[o O IIIIIIII O o]
- Messages
- 3,518
- Location
- Black Hawk, SD
:corn:

Sierra H3
Well-Known Member
- Messages
- 150
- Location
- Central Sierras
I lost a bead once in Hungry Valley. Snow was melting and the ground surface was a very slick combination of mud and slush. To get over a hill, I had to develop momentum down a rutted trail. My front right wheel dropped into the rut and broke a bead. The leak was slow as gravel prevented the tire the tire from reseating. I was able to change it at the top of the hill. At home, I used a jack to break the bead and a pump to reseat. I had to bounce the tire a few times on edge to help the reseating. Tires were Bridgestone 33s. It would have been nice to have these wheels rather go through all of that.
Last edited:
Tomorrow is the day that Tustin Hummer is going to mount my new Hutchinson wheels and Cooper STT tires. I'm really looking forward to it. I'll try a post pictures tomorrow but I'll have to take them in the dark since I’m picking it up at 6:00 PM.
I did a test fit of the 5 315/75R16 tires in the truck over the weekend. I have to mount then 3 across the front and 2 across the back and I can't close the slant back, but I'll get then there. The back seat will be full of boxes of wheels. I'll have to get pictures of that too.
I did a test fit of the 5 315/75R16 tires in the truck over the weekend. I have to mount then 3 across the front and 2 across the back and I can't close the slant back, but I'll get then there. The back seat will be full of boxes of wheels. I'll have to get pictures of that too.
M
MUTAINT
Guest
:corn:
Before I loaded the truck I weighed one of the Hutchinson wheels and they are 40.5 lbs.

Here is a picture of the bed of the truck with 5 Cooper STT 315/75R16 tires.

The back seat is wall to wall boxes of wheels.

All packed and ready for the trip to Tustin Hummer in the morning.
Here is a picture of the bed of the truck with 5 Cooper STT 315/75R16 tires.
The back seat is wall to wall boxes of wheels.
All packed and ready for the trip to Tustin Hummer in the morning.

08SolarFlareH3
Super Swampers
- Messages
- 2,525
- Location
- Finger Lakes, NY
I love the stuffed snug top pictured. Look forward to seeing the tires mounted and on the H3T. As for it being dark out at 6PM, find a light parking lot because we all need pics bad...............real bad :drool:

BW_Hummer H3
Well-Known Member
- Messages
- 1,084
- Location
- Texas
Can't wait to see them!