• Welcome to H4O! For a reduced ad experience, please login or register with the forum.

SO.... is there really no way to fix the steering rack issue on the H3?

reaper

Well-Known Member
Messages
527
Location
Denver, Colorado
Question for Hunner on this (thanks for the warnings and info, by the way!):

Why don't we create a solid connection rather than the sleeve plus the rubber? Why not something that could be welded into the bracket? We could et everything installed and lined up just right and then weld that bastard to the bracket?
 

Hunner

Well-Known Member
Messages
2,334
Location
Arkansas
The two I have installed I just used the sleeve, metal on metal. Overtime I may get some wear and have to add some thin shim.
I have thought that the outer half could be welded to the bracket. Then when the teeth are engaged would hold the other half in place but I'm not sure that would make it tight if no grinding was done or a shim of neoprene was used.
It would take some skills to weld the back half in place and have the rack inserted but could be done.
The hydraulic fittings are welded to the black metal tube, so I guess if care was used in keeping the heat down by tacking in short bursts and cooling between times the sleeve could be welded to the rack.
I just slapped in a sleeve on both my 06 and now the 08 Alpha and have not needed to do anymore, yet. If I start having problems I will go after the next step.
It seems there are lots of great minds here that are addressing their particular rack fit in a few different ways. It will be interesting to see what the final outcome is and what seems to work best.
Teamwork!
 

backcountryislife

Well-Known Member
Messages
858
Location
Dumont, CO
Yeah... it's pretty much like that Dan!!!!:giggle:


My only reason for wanting to add the rubber is that it allows for a little bit of expansion/ contraction, where I feel that a metal on metal mount will work, but like Hunner mentioned before, you'll want to check it every now & then to be sure it hasn't worn/ gotten loose. I think a LITTLE bit of rubber will give a "solid" mount, but keep the metal from wearing & keep it in place longer.
 

reaper

Well-Known Member
Messages
527
Location
Denver, Colorado
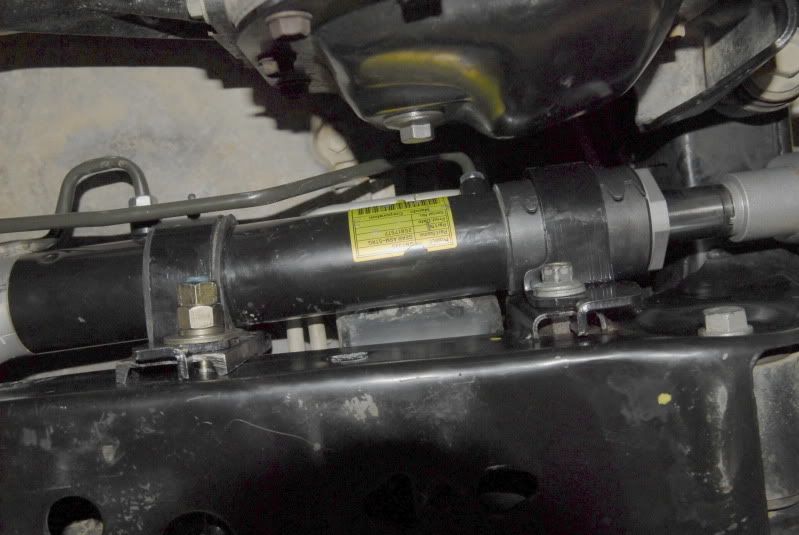
So I was talking to backcountryislife about this... Hunner: what about making your sleeve a little bit longer with a hole in it, so the line is anchored into the sleeve preventing it's horizontal movement? In your picutre, the sleeve is just outside of that, but what about anchoring the sleeve around that line output? We're wondering about the strength of that line fitting, how solid it is mounted into th erack or would that just snap it out. I think I was shot down but thought I'd throw the question out there anyways.
I think the sleeve with Alex's rubber and anchored to that point in the rack may be ideal, unless that's just going to snap that line right off. Which is probably the case, but... there's got to be something a little more solid to anchor too on that side of the rack. :huh:

_DSC8158.jpg
 

Hunner

Well-Known Member
Messages
2,334
Location
Arkansas
Notice in that picture my sleeve is 3 inches long. I mention this waay back. I made that one to fit with my BP tie rods as I have to cut boots to fit anyway. It is captive between the fitting and the rack end nut. I did not consider notching and have it go around the fitting because I don't think there are rotational forces involved, just left and right and up and down.
The problem I foresaw for people with OEM tie rods and boots, was that newer boots are harder rubber composite of some sort and will not stretch over the rack and sleeve both. So if you ever got replacement boots they would not fit.
So I cut a bunch of 3 inch I had for the first batch but got them to make me some 2 inch.
I installed a 2 inch on mine to test it and so far, have not had problems.
I think the band clamp on OEM boots will hold the boot on but if you try you can rotate it some on the smooth tube. I was concerned the sleeve could push the clamp and sleeve over so it would not stay on if it was not properly clamped.
I guess you could cut a fishmouth in the edge of a 2 inch and slide it over to the fitting. I too am worried if too much pressure was put on that it might be damaged. I have to check to see if a 2 inch would still have enough area under the bracket to hold it.
Then if a 3 inch was needed to do that it would move it away from the boot clamp as it would go over further to the fitting.
I don't have any extra 3 inch and to only get a few would cost quite a bit more instead of the volume price I have been getting on the 2 inch.

That won't fix the problem some people are having by not grinding the surface of the welded nut in the cross member and bracket back side so that it compresses against the sleeve. The sleeve is not squeezed properly by the bracket because of it's shape to fit the horseshoe shaped rubber bushing, so if you don't squeeze it together some at the top and bottom it has less area to push on the bracket and contain the sleeve.
 
Last edited:

backcountryislife

Well-Known Member
Messages
858
Location
Dumont, CO
The sleeve is not squeezed properly by the bracket because of it's shape to fit the horseshoe shaped rubber bushing, so if you don't squeeze it together some at the top and bottom it has less area to push on the bracket and contain the sleeve.


We're hoping that the left over rubbers that Alrock is sending will help that...:) I'm hoping that the rubber sheet will take up the space, and allow for some minor damping without allowing much flex.
 

Hunner

Well-Known Member
Messages
2,334
Location
Arkansas
After a long delay from 5 shops I had two submit samples of the skids within 15 minutes of each other Wednesday!
I think I need to start a fabrication shop management business.
 

atvspeed4

Well-Known Member
Messages
1,214
Location
massachusetts
Its crazy, I keep hearing that US small machine shops are going out of business but everyone I have been to has been booked straight out for months and cant take on anymore work.
 

tfm-Neil

Active Member
Messages
27
Location
Los Angeles
So I had my steering back apart again yesterday and noticed an issue with the steering rack mount that I can't recall anyone mentioning before. :whaa:

Long story short a few weeks ago Iinstalled my set of hunner sleeves with thin rubber in-between the sleeves and the rack like others have done. Well yesterday I had everything back apart to make sure everything was performing as it should. While doing this I noticed an issue with the passenger side rack mount, well actually the bracket on the frame that the strap bolts to. It seems that you are only able to clamp the rack down so tight before you start deforming the portion of the mount that is welded to the frame. I couldn’t figure out why I was having a more difficult time reinstalling the bolts in the mount but on closer inspection I noticed that the bracket on the frame was distorted. I checked itwith a straight edge and it was a bit over 1/16” low in the center. It was easily corrected with a pry bar but over time most likely it’s just going to distort again.

It seems that the since the bracket is made from a thinner gauge steel than the strap portion every time you tighten the mount down all the way it just deflects at the weakest point.

Has anyone else noticed this?

brackettag.jpg

Also has anyone had any luck finding derlin bushings to fit the driver side mounts? I’d feel allot better about having both sides of the rack semi hard mounted than just one side.
 
Last edited:

Hunner

Well-Known Member
Messages
2,334
Location
Arkansas
How thin was the rubber and did you use some on both halves?
From some of the replies I have read people are having an issue getting it tight enough, and did not do any grinding or squeezing the bracket together more like I have done.
Using the sleeve alone being about the same thickness as the OEM rubber should not exert any more force on the center of the bracket on the frame. Maybe how ever that happened is why some people cannot get it tight.
It seems that could happen when the OEM rubber was destroyed and continued to be run in that condition with the rack being leveraged against the bracket on the frame.
I did have a couple of people tell me with the OEM set up they had bent several of the clamps somehow. That to me means there was a lot of force going on in that area.
 
Last edited:

tfm-Neil

Active Member
Messages
27
Location
Los Angeles
I'm using a thin 1/16" rubber, one piece under each half of the sleeve. Pretty much the same as some others have been doing. Everything seems to be staying tight, I'm fairly certain it was staying tight the first time I put it together.

I’m just wondering if the strength of the bracket may be the limiting factor on how tight you can get the passenger side mount.
 

Hunner

Well-Known Member
Messages
2,334
Location
Arkansas
I'm not sure. I will have to look at that area next time go in to adjust some things. I did not think without any grinding you could get it tight enough to crush that area.
The area around the lower welded nut is so narrow I don't see how that could crush just from the force of the bolt so it is still possible to tighten the bracket.
We need someone with a new install of the sleeve to check that area first and see if they can tell if there is any damage. It must vary depending on mileage that has been driven with a blown out OEM bushing. I replace both of mine around 10,000 miles.
Now some people are doing it at 60-70 thousand miles.
 
Last edited:

backcountryislife

Well-Known Member
Messages
858
Location
Dumont, CO


Also has anyone had any luck finding derlin bushings to fit the driver side mounts? I’d feel allot better about having both sides of the rack semi hard mounted than just one side.


My guy who makes bushings said that he feels delrin is not the right material, so he's making them out of abs which he thinks is more ideal. He made a few sets for me, reaper, and 06h3 today. I told him to make a few extra, so there are a few unclaimed, but no big deal once we need to make more. He makes them by hand, so there's no set up fees... just him and his lathe. Let me know if you want a set, I'm not making $$ from them, just trying to help folks get a better setup when paired with hunner's sleeve.

He's also welding a tab that we can attach a center mount to on my and reaper's trucks... maybe we can come up with a simple way to get that on other people's trucks as well.

Sent from my A200 using Tapatalk 2
 
Last edited:

Hunner

Well-Known Member
Messages
2,334
Location
Arkansas
Yea I should get some just for experimenting with. Let me know how to get a couple.
Do you intend to press out the OEM? They have a metal sleeve inside. I guess the rubber is somehow annealed to the hole edges?
Will these bushings you have be ABS with a hole in the center and can be pressed in?
I'm still not sure if we need to have movement at the drivers side or not.
The knocking sound is coming from the passengers side with a blown out OEM rubber after only 10,000 miles.
Anyway here "is" the movement at that end.
video
 
Last edited:

backcountryislife

Well-Known Member
Messages
858
Location
Dumont, CO
Unless the rack is already broken... movement at the passenger side... is also movement at the driver's side... :D

Lock one side down, and the other side still moves... how do you think that will end :huh:

Just trying to do everything I can to get it set up to be as durable as possible.

Btw, if we need a metal bushing to put into the plastic one, we'll just get one, but I think the idea is to cut the rubber off the bushing & use that one.

$30 for bushings btw, he pulled the metal bushing out of the rubber & put it in the ABS on mine btw, just talked to him. As to getting it into the rack, it'll be a tight fit, but shouldn't need to be pressed since it won't need to be compressed like the rubber to gain durometer.

If you want a set, just shoot me a PM & I'll get orders to him.

He is also going to make the flex lines himself from now on, so if I can get an idea of who might be interested in them, that would help too. He's going to order the fittings, and obviously having an idea how many will help get costs down. Mine were $80, he thinks he can do better than that, and since he knows what the application is for, he knows what to keep & what will work in the situation.
 
Last edited:

Hunner

Well-Known Member
Messages
2,334
Location
Arkansas
Thanks for getting involved in this. I made my fixes and went on from there until something else came up.
On mine I tightened the bolts on the drivers side and it seemed to be firm. I'm guessing over time the rubber in those wallowed out some and allowed some slack.
It may be like that again? I don't know if we need the metal sleeve or not. Seems it would save wear on the ABS? There would be a decision if it would not allow the bolt to be in full contact with the ABS. It may be made to tighten against, then have the surrounding rubber isolate the rack?

Do you know if your guy thought those hydraulic line fittings were something non-standard? I do recall where I had mine made they either did not have the fittings or they were something he had not seen before. Could have just been a misunderstanding on my part.
If so original pipes would have to be cut and used like mine and yours ended up.
I did buy some extra pipes as GM calls them.
Mod on!!

I decided to go look. Both of them have a large flat metal surface on one side and a smaller area of metal on the other.
That does stick out further than the rubber.
7083.jpg
 
Last edited:

backcountryislife

Well-Known Member
Messages
858
Location
Dumont, CO
That's the beauty of forums... one guy fixes prob. #1, another guy works on #2, then a few more find ways to fix each of them in a different way yet!

On my lines, the did use one end that they had instead of using mine, the main reason that Bill decided to have them use some of my line was that it needs to fit around certain spots, so using SOME rigid line (which I didn't think I wanted) allowed the rack to go around the frame easier without any new spots that might start rubbing... creating yet another new issue! The lines came back in just a couple days... must not have been anything too special on them anyhow, the upper left fitting is the one end where they didn't use my stock line.

393428_3750032391434_1733600367_n.jpg

I think we definitely need the metal sleeve, otherwise the ABS will be hitting the bolt (is that part threaded or smooth?) and wearing. If the part of the bolt that it goes around is smooth... I suppose we don't need them, but he's got a few made now & is doing 6 sets so far, this batch at least will have the hole intended for the sleeve that was in the rack.
 
Top