• Welcome to H4O! For a reduced ad experience, please login or register with the forum.

SO.... is there really no way to fix the steering rack issue on the H3?

backcountryislife

Well-Known Member
Messages
858
Location
Dumont, CO
I just ordered a new rack... $200 plus $50 shipping. PM me for info if you need one, don't want to post the source and have them disappear overnight. :)


I DON'T quite think that's a problem....:wink:


Mark has HUNDREDS OF THEM!!!
He bought out the supplier's excess stock, if I recall he's got over 500 of them.


Even at the pace I break them at... it'll take a while to run him out!!!
 

Hunner

Well-Known Member
Messages
2,334
Location
Arkansas
I think the word is out on that source and the other source has doubled their price to $349 after the first 20 sold really quick. The local dealer will sell me those at that price with no shipping added in.
I had often wondered how GM was going to supply parts for 10 years if they or the manufacturer started selling inventory to liquidators which would dump them online.
The regional GM warehouse the dealer uses does not show a large quantity the times I had them check.
Makes you wonder.

Something to think about is on the four forums, a representation of the most wheeled H3/H3T's if everyone bought a spare????
and some people are hoarding!!

My other thought is, what else might use this rack??
 
Last edited:

Mr_Rich

Well-Known Member
Messages
667
Location
Yucaipa & Santa Maria
I'm wondering if there's an aftermarket steering rack that's adaptable; something non-GM even... Maybe this was one of those things that would've been sorted out had the marque continued. Oh well.
 

Portager

■ ☼▐▐▐▐▐▐▐ ☼■
Messages
1,506
Location
Silverado
I think the word is out on that source and the other source has doubled their price to $349 after the first 20 sold really quick. The local dealer will sell me those at that price with no shipping added in.
I had often wondered how GM was going to supply parts for 10 years if they or the manufacturer started selling inventory to liquidators which would dump them online.
The regional GM warehouse the dealer uses does not show a large quantity the times I had them check.
Makes you wonder.

It is called just in time delivery. Or in our case on demand delivery. The bean counters don't want money tied up in spares that are sitting on shelves. In our case they don't care how long it takes to get replacement Hummer parts because they abandoned Hummer owners long ago.

I don't think it is GM or their suppliers who are blowing out inventory. They wouldn't sell that much below retail when they know they can get full retail at a future date. I think it is local distributors who are selling off inventory. Many dealerships have closed or are no longer service Hummers. They are probably selling at cost to recover their investment.

Sent from my Galaxy Nexus using Tapatalk 2
 

Hunner

Well-Known Member
Messages
2,334
Location
Arkansas
Either way don't expect them to be so available in the years to come. Some larger number of produced model vehicles do seem to have suppliers or manufacturers pickup the slack and you can order almost a whole Jeep from JC Whitney!
I don't know what the minimum order for the original manufacturer to fire up to make them as opposed to the mass orders that GM would have contracted for.
It won't be just in time if no one is making or stocking them for GM.
It could be the places that bought large quantities want their money back sooner than later and get a smaller profit fearing that a vehicle out of production my soon not have much demand for such parts. Like I mentioned the place I got mine from must have been testing the market with the cheap price and once forum members spread the word and inventory dropped they doubled the price.
One place is in Canada and one in Michigan both of which are not local to me and are large warehouse liquidators.
One even states they only sell OEM surplus not aftermarket or rebuilt.
What constitutes surplus I don't know but just recently there seems to be a lot on the market, for now, people are actively buying them.
 
Last edited:

reaper

Well-Known Member
Messages
527
Location
Denver, Colorado
Ok, this might be a dumb question, but here goes: is there a way to secure the 2 sides of the rack together so they don't separate? Is there a way to weld them together or somehow prevent them from separating?
 

atvspeed4

Well-Known Member
Messages
1,214
Location
massachusetts
Not a dumb question or idea at all!

Thats the solution to the silverado steering rack that some of the long travel guys still use. There rack is different though and has mounts on both ends built into the rack. They make a brace that spans across the rack and bolts in.

In our application if we carefully welded a mount onto the passenger side steel tube we could make a mount that was solid or had bushings and that would perfectly support the rack in the stock location and end this silliness. Problem with that is most people do not have the ability to weld to their stock rack, especially putting minimal heat into the factory tube so this would have to be some kind of exchange program. We sent off the clamp design I posted earlier to two different machine shops and are waiting to hear back from them.
 

silvrzuki77

Well-Known Member
Messages
556
Location
Vegas
Patiently awaiting the brace kit atvspeed4!!!! Actually the faster the better lol. I actually really like the IFS out here in the desert would have been better with coilovers, but this crappy steering setup just makes me wanna cringe and want to switch to a solid axle. I have a spare rack for now that I carry for my old man and myself, but when the steering breaks out in the middle of no where, its getting dropped off at my buddies shop for SAS. Does anyone have pictures or a write up on adding another brace in the center??
 

06 H3

a.k.a. "The Jackal"
Messages
9,506
Location
Meridian, ID
Loving the ideas...so if we could brace this would u believe it could hold up to 37s? If so then I only have to figure out a diff solution then lol
 

backcountryislife

Well-Known Member
Messages
858
Location
Dumont, CO
well... after doing the extra bracket, the sleeve, and ABS bushings for this thing... I've got the rest of the season (probably till mid october if I stick with low alt runs) to tell you if it holds up to 35's!

Considering that waiting for parts has cost me over 1/2 of my summer... I'm going to be getting out a LOT this fall, and I won't be taking it easy.
 

Hunner

Well-Known Member
Messages
2,334
Location
Arkansas
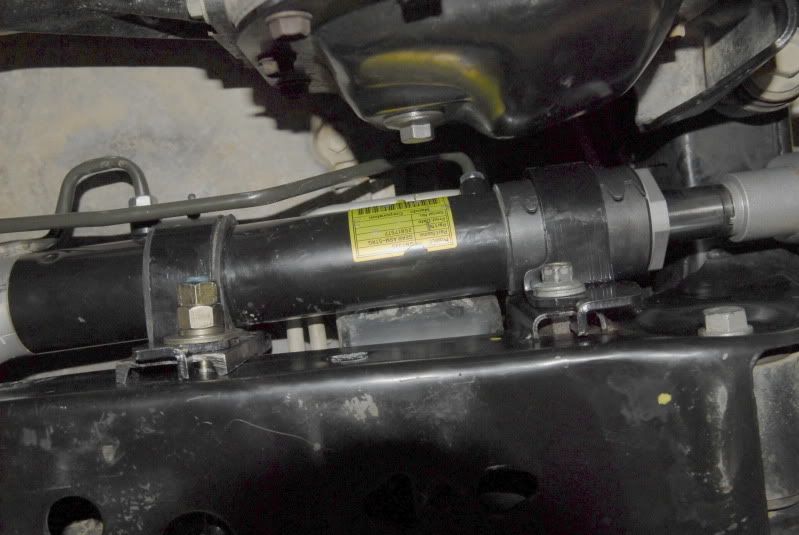
Does anyone have pictures or a write up on adding another brace in the center??

It's in the War and Peace length thread on sleeves.
http://www.hummer4x4offroad.com/forum/showthread.php?295-HUNNER-EXtreme-Steering-Rack-Sleeves
_DSC8158.jpg
 

atvspeed4

Well-Known Member
Messages
1,214
Location
massachusetts
Well it looks like the two shops I sent the files to have their CNC machines booked a month out... so I have the name of a new shop and hope to get out to them possible tomorrow or friday to see what their schedule is. Im thinking we will be fine on 37s with solid bushings driverside and a solid clamped passenger side.

Backcountry- How hard was it to press out the stock rubber bushings in the rack?
 

reaper

Well-Known Member
Messages
527
Location
Denver, Colorado
How difficult is it to replace the rack? Do I just start unbolting everything? Is there a line to disconnect first to drain the power steering fluid?
 

06 H3

a.k.a. "The Jackal"
Messages
9,506
Location
Meridian, ID
It may be a bitch to do with the rancho lift...that's why I haven't done mine yet. One crossmember blocks a bolt. I think it's do able but I'm not putting in my new one until its as beefed up as possible with stronger bushings, a brace 2nd mounts etc.
 

silvrzuki77

Well-Known Member
Messages
556
Location
Vegas
Thanks Hunner, is there a part number for the crossmember part of the bracket or did u make it? I will probally wait to see what atvspeed4 does first then go from there.
 

backcountryislife

Well-Known Member
Messages
858
Location
Dumont, CO
Well it looks like the two shops I sent the files to have their CNC machines booked a month out... so I have the name of a new shop and hope to get out to them possible tomorrow or friday to see what their schedule is. Im thinking we will be fine on 37s with solid bushings driverside and a solid clamped passenger side.

Backcountry- How hard was it to press out the stock rubber bushings in the rack?


Not sure yet.

The guy who I sled for is also a machinist, so he makes the bushings & will do the work on this. He's also already sourced the flex lines for me a few days ago. I'm trying to get down to him soon so I can get you guys pics of what we're doing there. We're using a full flex line instead of the small unit Hunner did (brazing it in), just for simplicity, cost and to avoid any extra junctions that could possibly fail. I just took his idea & went the cheapo route like I usually do:thumbs: (I feel there's no compromise in doing this though)

I'll have more answers in a few days, costs on the lines & bushings, and in a few weeks... results on how the bushings feel, and how well the rack is holding up as I'm not going to baby it anymore.
 

Hunner

Well-Known Member
Messages
2,334
Location
Arkansas
Hmmm, ok. I have the skids off but that front crossmember does look a little close. I'll let you know then. :)

WHOA there WAIT!!!!
You must tie off the steering wheel before proceeding. When you disconnect the steering shaft from the rack, if the wheel spins, which it will try to do, it loses it's index to the stabiltrac and you will most likely have to take it in to a dealer to reset that point.
There is supposed to be a place under the dash on the steering column to insert a GM special tool or find the appropriate size pin punch to insert. I have not done that or looked for it, yet. I did not know about that either the first time.
I used the ole rope trick the second time.
That is how I know to pass on this little bit of information.

There are two lines on the drivers side. Tie some rags around them and don't get fluid in your eyes!

You can chose whether to remove the tie rods at the knuckle and the whole assembly or disconnect the inner tie rod at the rack. If you do the later you will not be able to re-stake the little detent tab to lock the tie rod end. I on occasion have removed and replaced OEM tie rods and just used locktite. When you tighten up the inner ball end into the rack, it gets tight when it lines up with where that detent is. Pulling harder on a torque wrench does not seem to move it past that point. I would suggest using a pipe wrench and cloth on the inner rack when tightening the tie rods so as not to torque the rack or mark it up.
 
Last edited:

Hunner

Well-Known Member
Messages
2,334
Location
Arkansas
Thanks Hunner, is there a part number for the crossmember part of the bracket or did u make it? I will probally wait to see what atvspeed4 does first then go from there.

I used an OEM bracket and just used the OEM rubber bushing thinking that might compensate if I some how pulled or pushed out on the center of the rack enough to cause mis-alignment.
Then I used a piece of channel and fabricated a backing plate. You have to compensate for the weld on "your" crossmember so it fits right.
It's a bit tough drilling the hole straight and level thru the cross member.
I wrote that up some where.
7920.jpg

centeraddedbracket.jpg

If you look really close you will notice that OEM bracket is a mirror image of the ones that come on the H3. I ordered it from a dealer and it was the opposite the way it was made. All we could figure was maybe it was for a left hand drive but I never heard from Nugget if that might be the case.
Either way I would think the regular ones would work.
Just note that I offset the hole so the bracket would be held by the bolt.
 
Last edited:

06 H3

a.k.a. "The Jackal"
Messages
9,506
Location
Meridian, ID
You can chose whether to remove the tie rods at the knuckle and the whole assembly or disconnect the inner tie rod at the rack. If you do the later you will not be able to re-stake the little detent tab to lock the tie rod end. I on occasion have removed and replaced OEM tie rods and just used locktite. When you tighten up the inner ball end into the rack, it gets tight when it lines up with where that detent is. Pulling harder on a torque wrench does not seem to move it past that point. I would suggest using a pipe wrench and cloth on the inner rack when tightening the tie rods so as not to torque the rack or mark it up.

If you really want to restake the detent tab you can. I went to home depot and got a few punches. One punch I grounded down a bit so it fits perfectly to break the detent when removing a broken tie rod and the other punch is grinded down on the side so I can use a hammer and punch in a new detent for the new tie rod. If you resuse an inner tie rod you will be forced to make it a tad tighter or looser so you have room to redetent it. I keep those punches it my trail repair kit in case I break a tie rod.
 

Hunner

Well-Known Member
Messages
2,334
Location
Arkansas
I was never able to re-tighten one "past" that point and I did not want to stop tightening "before" that point. I could also never get a crow's foot up in there and connect to a torque wrench. I think there is a GM tool for that but after finding that it bottoms out on the end of the rack at that point, so I just do that. I had to measure all of that for the clevis I had made for my BP tie rods.
 

4speedfunk

Well-Known Member
Messages
4,250
Location
Tardville
Definitely tie off the wheel. I found that out the hard way. If it gets spun past 2-turns in either direction it will break the coil inside the column. This "coil" is basically a coiled ribbon-wire underneath the airbag. It feeds 12v power to the Airbag and the Horn. If you've broke this wire, its easy to diagnose...you'll have no horn! The bad news?...you have to replace the entire smart-stick assembly (turn sigs, cruse, wipers, etc). The good news?...its cheap and fairly easy to do. Still you can avoid the whole thing by taking the time to tie off your wheel.

Hunner...there is indeed a special tool to lock the column, and it gets inserted into a threaded hole in the plastic shroud on the bottom of the column (just below the steering wheel). There are some screw-holes under there, and if you look close...there's one hole without a screw. Thats your baby. Or a piece of rope tied to the brake pedal works good too.

Also true...if the wheel gets spun, you can loose the index for the VSS. At the base of the column there is a small sensor mounted to the steering shaft. It reads the shaft position, and tells the computer what angle your front wheels are at. Its critical that it remains "centered" or you'll get the KISS concert dashboard warnings. What is NOT true is that you'll have to take it to the dealer to reset it. It CANNOT be re-set via the OBD port. Instead it must removed and reset by hand which involves pulling the steering column. The instructions say it must be replaced with a new one but, that is NOT true either. They just tell you this because it takes some time fiddling with it to get it back to "zero"...and its faster for the monkey in the service department to simply open up a box and install a new one.

This sensor costs $90 and it comes out of the box with a lock-pin on it (monkey proof), and the idea is that you install it with everything properly centered, then you pull the pin to allow it to read. The sensor is basically a teeny-tiny ABS sensor and reluctor ring, (hall effect) inside a sealed plastic housing. I took mine off and inspected it closely. There is a small hole in it, where the lock pin used to be. If you spin the sensor around long enough...you will eventually find the sweet spot where a paper clip will slide completely into the small hole. This indicates that you have found the "center" position, and it can then be re-installed on the column, and then re-installed into the truck.

Unfortunately my wheel got spun during the SAS project, and I was forced to become a self-taught expert on H3 steering columns. There is a lot more going on with the H3 steering than a traditional vehicle, and I highly recommend tying it off. It will save you tons of time and money.
 
Top