• Welcome to H4O! For a reduced ad experience, please login or register with the forum.

SO.... is there really no way to fix the steering rack issue on the H3?

atvspeed4

Well-Known Member
Messages
1,214
Location
massachusetts
Its just going to be a different kit. We currently sell similar solutions for Chevrolet S10's (We have a tie rod kit and also a idler arm kit) two different steering problems. The h3 again has two different steering problems (tie rods and steering rack). Thanks GM!

I don't have a completed kit yet, I have the inner ball sockets made and also bought the outer tie rod ends. Once I have the adjuster sleeves I will post up full pics here and on our website. (Along with becoming a sponsor here)
 

backcountryislife

Well-Known Member
Messages
858
Location
Dumont, CO
Just curious, how many people have broken the 16mm tierods?

Considering I've been through a stack of racks, and not the tiniest bit of bend to my tierods, it makes me wonder how big an issue that really is?


Btw, unless the passenger side clam can avoid rotational forces (being wider, and being strongly attached to the rack) looking at wear patterns it seems like the forces are up & down as well (snapping the rack like a piece of wood, as compared to pulling the rack apart) so the center mount still seems like a good idea to me, but I'm not sure how well that clamp will reduce rotational force.
 

atvspeed4

Well-Known Member
Messages
1,214
Location
massachusetts
Just curious, how many people have broken the 16mm tierods?

Considering I've been through a stack of racks, and not the tiniest bit of bend to my tierods, it makes me wonder how big an issue that really is?


Btw, unless the passenger side clam can avoid rotational forces (being wider, and being strongly attached to the rack) looking at wear patterns it seems like the forces are up & down as well (snapping the rack like a piece of wood, as compared to pulling the rack apart) so the center mount still seems like a good idea to me, but I'm not sure how well that clamp will reduce rotational force.

Only a few have on this site but I have read of many more on the "other" forums. I may be getting 37s soon and do not want to play that game. Ive also received several emails on our website from guys looking for upgraded tierods. Two of them had the rancho lift and 37s.

And yes the clamp mount will resist rotational force, that is a good point.
 

Chook

Well-Known Member
Messages
706
Location
Brisbane (Australia)
Warwick called me late yesterday to say the H3 bushes have finally come in.

I am taking the day off work today so he can use my H3 to test fit the new bushes & write the fitting instructions etc.

All going well you should be able to order these online from his website shortly.

Will post here later today to let you know how it goes.


It's my vehicle in the video. Warwick got a set of aftermarket bushes that were close and modified them to fit. He then took measurements off mine and send them away to get a specific set made for the H3

I spoke with Warwick last week & he confirmed they are currently in the production queue making them. He asked if I could come back once he receives them to do a trial fitting to make sure they fit well before he starts shipping them out to customers. I said I would be glad to, let me know as soon as I come in & I will bring my H3 over.

FYI. I originally thought my problem was the passenger side but he showed me that the real problem is the drivers side as they take all the torque (The Passenger side is just a holder). These are polyurethane. They are the same material used in other aftermarket suspension components (Upper/Lower Arms, Leaf springs, Shock absorbers, Sway bars, etc.) to upgrade from OEM Rubber. I mentioned to him that some folk are looking @ Aluminium and or welding them solid, he mentioned that NVH might be an issue if you mounted them so rigidly. The poly bushes are stiff but not rigid.
 

H3slate

Brush raked
Messages
983
Location
Tualatin, Oregon
Sweet!! Can't wait, I had sent the company an email and they said it should be ready in the next couple of weeks, which today is sooner than expected.
 

Hunner

Well-Known Member
Messages
2,334
Location
Arkansas
Just curious, how many people have broken the 16mm tierods?

Considering I've been through a stack of racks, and not the tiniest bit of bend to my tierods, it makes me wonder how big an issue that really is?

I think the large amount of damage was with the 14mm.
I guess it's not an issue unless you are one of these guys! Some of these are silver 14mm but some may have been black 16mm. Hard to tell in some of the pictures.
I guess I should have done better keeping records. If someone wanted to they could trace down what model H3's those people had to find out. The introduction and replacement with the 16mm came about when the Alpha was produced and did seem to reduce the number being destroyed. Part of that may have been after the 06 were out for awhile people realized you could not flog an H3 over rocks with out consequences.
http://www.hummer4x4offroad.com/forum/showthread.php?1948-Tie-rods-broken
 
Last edited:

Chook

Well-Known Member
Messages
706
Location
Brisbane (Australia)
Warwick called me late yesterday to say the H3 bushes have finally come in.

I am taking the day off work today so he can use my H3 to test fit the new bushes & write the fitting instructions etc.

All going well you should be able to order these online from his website shortly.

Will post here later today to let you know how it goes.

Did the test fit today of the prototype new bushes from www.ultimatepowersteering.com.au

The Polyurethane bushes were a perfect fit but the metal sleeve in the centre was 3mm too big. The good news is this won't stop the production run of the bushes so should be still on track in the next 2 weeks they should be available on his website.

In the meantime they are currently looking at a variety of freight options to reduce cost of shipping to the USA.

They also advise that the best payment option (for you & them) is via Paypal so if you haven't got a Paypal a/c then you might want to look at that also.

Hope this helps.............

Chook

P.S. here is a link to them doing my H3 the first time. The final kit will look the same as this.

http://www.ultimatepowersteering.com.au/hummer-h3-8-07-4-10/
 
Last edited:

JGBB04

Well-Known Member
Messages
520
Location
Tampa Bay
In the meantime they are currently looking at a variety of freight options to reduce cost of shipping to the USA

Hows that saying go "No Worries Mate" we'll just have Skippy pack an extra suit case the next time he comes to Moab :)
oh & you can bring one also :mock:
 

Chook

Well-Known Member
Messages
706
Location
Brisbane (Australia)
Hows that saying go "No Worries Mate" we'll just have Skippy pack an extra suit case the next time he comes to Moab :)
oh & you can bring one also :mock:

He knows the lingo.......... Reminds me one of my trips home from Boston. I had 3 suitcases of checked in luggage but all my clothes were in my carry on........ From memory I had Volant CAI, Front Mount Hitch Receiver, Fox Racing Shox, Braided Brake Lines, & Gibson Dual Exhaust............... When I got home I could see my bags got a lot of attention with around 13 Inspection Leaflets from your security folk.
 

H3slate

Brush raked
Messages
983
Location
Tualatin, Oregon
Just installed the new and improved Hunner Extreme steering rack sleeve & bracket. Some new challenges during the install, but so far so good. Will report back after commuting for the week. And pics too!
 

H3slate

Brush raked
Messages
983
Location
Tualatin, Oregon
Hunner Extreme "Franken" steering rack sleeve and bracket

Here is the franken bracket I got from Hunner to "test". :cheers:

mini-P1020534.jpg


My previous setup was a partial hunner sleeve and partial "whatever curved scrap metal" was available.*

*All parts were generously supplied by Hunner, and having those parts saved my rack from disaster on the trail.

I took the old setup out and got ready to put in the new setup. After a fresh coat of paint, came to the first challenge.

mini-P1020539.jpg


With the sleeve welded to the backing bracket(a bracket that I think is totally necessary, my previous setup had bent in the metal on the frame behind the sleeve and bracket) getting the part to fit behind the rack was difficult. I loosened the driver's side mount and removed the rubber boot on the passenger side. This gave me enough room to leverage the rack away from the frame and get the sleeve in behind the steering rack.

mini-P1020540.jpg


Once that part was in, the rest was pretty straight forward. Getting the franken bolts started was hard, there is not a lot of room between the bracket and the front diff, once started they were no problem. I did apply some loctite to the bolts to keep them in place. It would be nice to have those bolts a little bit shorter, just for peace of mind for clearance, and to make it easier to get them started.

mini-P1020543.jpg


I am pretty happy with the results. This new bracket allows for no movement up, down, or backwards and forwards. Given the condition of my drivers side bushings, there is a little side to side movement, but it is less than before.

I am not done fixing the front end. I feel like I need to either replace the bushings on the drivers side to eliminate movement, or get a new rack. I also have some alignment issues, which look like stem from worn out control arm bushings. Hope to get those replaced soon and get a new alignment.

Thanks again Hunner for letting me be one of the test dummies. Will hopefully be hitting the trails to give the new bracket a true test. So far on my 60 mile daily commute, I have seen improvement in how the front end handles.
 

Hunner

Well-Known Member
Messages
2,334
Location
Arkansas
Thanks for that report.
You must have a small camera that focuses close up!
I have trouble getting mine up in there and have to back off.

I figured there would be some things to move to slide that in there but worth it.
1/2 was the shortest bolt I could find in stock.
I think I will grind mine down so only a few threads are showing when it is tight. That way I know it did not bottom out before getting the sleeve as tight as possible. I'm still running mine not welded but hope to fix that soon. I have been happy that even like that it stayed in place, so far.
 

amrg

Well-Known Member
Messages
2,317
Location
Qatar
I think your steering wheel vibration at IDLE is a different issue. Does your truck vibrate at idle too? If so it could be that your engine mounts are gone. The above solves/reduces that knocking feeling you feel in the steering wheel when you drive on uneven/offroad terrain, its like someone knocking on a steel shaft...
 
Last edited:

HUMMERADDICT

Well-Known Member
Messages
252
Location
NH
I think your steering wheel vibration at IDLE is a different issue. Does your truck vibrate at idle too? If so it could be that your engine mounts are gone. The above solves/reduces that knocking feeling you feel in the steering wheel when you drive on uneven/offroad terrain, its like someone knocking on a steel shaft...

oh. ok. i guess i don't have that problem.
 

am4x4

Active Member
Messages
40
Location
simi valley, ca
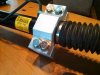
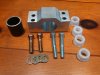
I have been working on a solution to this problem for a while and just got back from picking up my prototype. The key feature is the solid pass side mounting block, this will keep the left half of the rack in place and uses the two stock mounting locations as well as two additional bolts to provide extra clamping force. There is no point in securing only half of the rack so I will also be providing new bushings for the drivers side mounts made from super hard UHMW.

This product still has to be tested but they should be available soon. The kit will include the completely new pass side clamp, new hardware for the pass side mount, hard bushings for the drivers side mounts, and a tool to press out the old drivers side mounting bushings. Pricing has not been nailed down yet but it will be less than a new rack.
 

Attachments

  • h3 clamp1.jpg
    h3 clamp1.jpg
    60.2 KB · Views: 474
  • h3 clamp 2.jpg
    h3 clamp 2.jpg
    62.4 KB · Views: 447

amrg

Well-Known Member
Messages
2,317
Location
Qatar
I have been working on a solution to this problem for a while and just got back from picking up my prototype. The key feature is the solid pass side mounting block, this will keep the left half of the rack in place and uses the two stock mounting locations as well as two additional bolts to provide extra clamping force. There is no point in securing only half of the rack so I will also be providing new bushings for the drivers side mounts made from super hard UHMW.

This product still has to be tested but they should be available soon. The kit will include the completely new pass side clamp, new hardware for the pass side mount, hard bushings for the drivers side mounts, and a tool to press out the old drivers side mounting bushings. Pricing has not been nailed down yet but it will be less than a new rack.

Great work!!! Keep us posted!
 

atvspeed4

Well-Known Member
Messages
1,214
Location
massachusetts
Hmmm looks familiar to the one being tested on my h3 for a while now...

Since I have one installed already and have logged over 1,000 miles I can tell you that that bushing material is not the right thing to use on the driverside and also the design of those bushings will push the steering rack out on that side. We tested several bushing designs before we settled on what we have now.
 
Last edited:

silvrzuki77

Well-Known Member
Messages
556
Location
Vegas
Any pictures of your setup? I dont think he drove from cali to steal your design? Backcountry and him have been talking about the design 3-4 months ago.
 

am4x4

Active Member
Messages
40
Location
simi valley, ca
Hmmm looks familiar to the one being tested on my h3 for a while now...

Since I have one installed already and have logged over 1,000 miles I can tell you that that bushing material is not the right thing to use on the driverside and also the design of those bushings will push the steering rack out on that side. We tested several bushing designs before we settled on what we have now.

Not sure what you mean by "push the steering rack out on that side" but it will bolt up in exactly the same position as stock. The properties of the bushing material are perfect for the application, allow a press fit, and will not wear like a metal on metal bushing will. Are you saying you tried that exact material and design?

I know the basic shape is similar to the ones you guys are working on but there are some significant functional differences. The reality is you are pretty limited as far as the shape of the clamp in this application. I was actually working on this before I found this forum and long before you guys posted pics, I was made aware of the issue by a post on Pirate4x4 by "backcountryslife" and started out talking to him about testing it. The similarities are purely a coincidence dictated by the application.
 
Last edited:

atvspeed4

Well-Known Member
Messages
1,214
Location
massachusetts
Any pictures of your setup? I dont think he drove from cali to steal your design? Backcountry and him have been talking about the design 3-4 months ago.

Lol go to the beginning of this post and start reading. I was part of the convo and I posted up the cad drawing then for my idea of a solid two piece mount. It was in July I believe. Alrock had scorpworks build one and they are the chosen vendor to sell them on this site. Hence why we are not selling them here.
 
Top