• Welcome to H4O! For a reduced ad experience, please login or register with the forum.

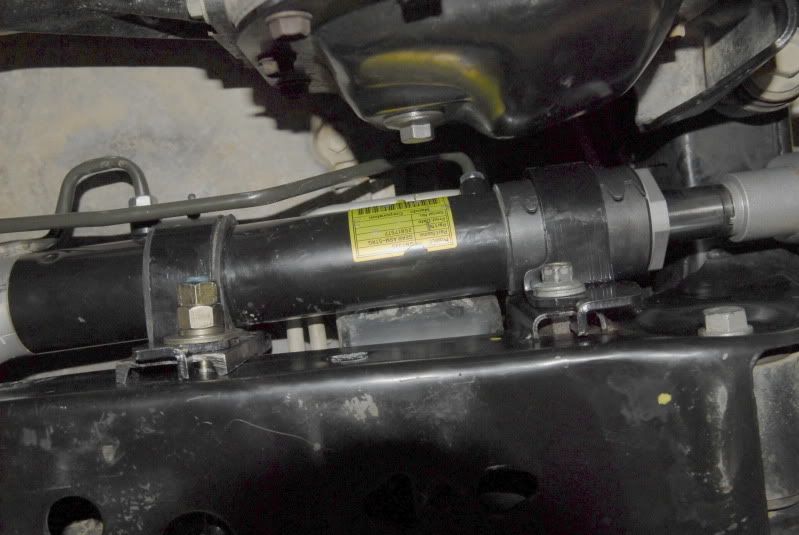
HUNNER EXtreme Steering Rack Sleeves

silvrzuki77

Well-Known Member
Messages
556
Location
Vegas
I could almost tap the sleeve and move it even with the bolts tightened. I added piece of plate behind it like done earlier and now i get maybe 1/8th of movement out of it now. I was going to try some of fiber material around just the cyclinder. I checked and nothing is cracked on the box. I was watching the driver side bushing moving quite a bit the first time around.
 

silvrzuki77

Well-Known Member
Messages
556
Location
Vegas
Okay i think I finally fixed it? Ill keep checking in the weeks to come. Here is a before video of just the sleeve inserted.

Then I re-read older post about people having problems and Hunners solution.
I used Jr3t frame bracket/spacer jb welded on. Still had some play like 1/8th.
Then I used some of the red rubber sheet gasket from ACE around the main steering cyclinder then the sleeve over it. Here is the second video with the amount of play now. Very tight steering now.


What do you think Hunner? Any concerns this way?
 
Last edited:

Hunner

Well-Known Member
Messages
2,334
Location
Arkansas
Looks like it solved the movement problem. I never saw that much lateral movement except when I broke my rack! I did not think the two bushings at the other end would allow that much. That shows how powerful hydraulics are.
I would just check it and make sure it stays in place. The only thing I thought of with the rubberized material in there is that may eventually wear and get loose but way better than the rubber OEM bushing and easy enough to replace.
I guess if you guys are comfortable with spacing it out 1/8 of an inch that may work fine. Like I mention I was just concerned about mis-alignment but as noted it was really moving around with the OEM bushing and creating all kinds of pressure.
In my case I was going for the metal on metal with no slack. I will repeat on the 06 I did not do anything but stick it in there, but that one was also 3 inches long and captive between the hydraulic fitting and slight edge of that large end cap on the rack tube. I shortened it when I decided to sell some so it would fit between the tie rod boot and hydraulic fitting with stock tie rod boots. On the Alpha I did some grinding but have since found out squeezing the bracket first and then installing it works as well. Then the only thing that may have to be done is grind out the holes in the bracket a little at the top of the top one and bottom of the lower one enough to insert the bolts after squeezing which will not be much.
Everybody just check them and report back any changes over time.
Apparently some of us are wheeling hard because GM thinks that mount is adequate.
 
Last edited:

H3slate

Brush raked
Messages
983
Location
Tualatin, Oregon
So finally put my steering rack sleeve on. I still have a little bit of movement, trying to decide if I need a new bracket or material between the sleeve and bracket.

That top bolt was not fun to get off for the first time. :whaa:
 

Hunner

Well-Known Member
Messages
2,334
Location
Arkansas
Yea that bolt is a test of patience. You cannot attack it you have to feel your way and get the right spot to get up in there. I jiggle it to make sure it starts going back in. A little anti-seize helps. I also chased the threads on the bolt and the weld nut in the frame.
Did you try squeezing the bracket top and bottom some on the back side where the gap is?
I'm not sure a new bracket will help, just some adjusting of the one you have. I was persistent with mine and tried several methods before telling everyone about these. If you keep at it, it can work with just the sleeve. If you cannot get it tight then I guess try the thin rubber gasket stuff but make sure it gets tight, you will have to check for wear.
I tried a piece I sliced off some of the 3 inch ones I shortened but the diameter being the same will not slide over it. I cut the ends off of it and tapered it to conform better. Being spring steel I can compress it on there flush in the vice. I left enough gap that I hope it will squeeze on tight when the bracket compresses it.
If that somehow works, for those of you that cannot get it tight, I can just give you one of those pieces. I'm glad I'm a hoarder!
In your case if you don't want to try to adjust the bracket see if this will go in there and tighten up and report back.
PM me your address. I want to help you get this right. It won't conform as far around in contact with the bracket as the sleeve alone but if you get the bolts tight this might work for you.
I have 5 extra racks and the one installed. They are all the same diameter and so are the brackets.
However as noted somewhere way back there the bracket is not shaped exactly round rather it is horseshoe shaped to conform to the OEM rubber bushing, we know how well that worked.
DAH_6945.jpg

DAH_6946.jpg
 
Last edited:

H3slate

Brush raked
Messages
983
Location
Tualatin, Oregon
Thanks Hunner, when installing I did not remove the rack from the crossmember. How important is the little tab at the bottom of the bracket? I feel like when trying to get the bracket back on, you have to get the top part in place and then use leverage to get the tab in place at the bottom. By having to do this I think any adjustments made to the bracket would be undone by pulling down on the bracket to get it in place.

Maybe I need to adjust the bracket with the sleeve in it, then remove the other mounting bolts so I can get the bracket on the rack and then slide the rack and bracket into place.

PM sent for the extra piece of steel. The first time I put the sleeve on and bolted down the bracket, the sleeve was loose in the bracket.
 

Hunner

Well-Known Member
Messages
2,334
Location
Arkansas
I have not removed the rack any of the times I have done this. I don't know of any advantage to that. As in some of those posts, I mention I don't think it will be tight without some work on the bracket. That is why mine fits tight. I know it seems to be a pain but it is a mod. I might try "adjusting" a bracket or two and do a core swap for people having trouble. I don't know for sure that would work in all cases but I am thinking it might. The problem would be I'm not sure I can do that in the vice on my test rack and have it fit on the vehicle. I'm not sure how many times I can stand to fit them on my H3. lol Maybe if I pull mine one more time and try to match one to it for a guide that would work.
There have only been a few that could not get it tight but like you, I don't think they worked on the bracket enough.
We can get you going if your knuckles hold out.
You can try this piece and see if that works for you.
On the little tab, in a moment of frustration and an oversupply of cool tools, I finally cut that damn thing off while test fitting these sleeves repeatedly!! lol
I have to go back and read that epic bunch of posts but I thought I admitted to that.
 

H3slate

Brush raked
Messages
983
Location
Tualatin, Oregon
Nice. Next time I take it off I will put the bracket in the vice and conform it to the sleeve. i will probably get rid of the tab, just seems to be in the way. Trying to figure out why it is there in the first place. Maybe it served a propose during vehicle assembly and now is just in the way. Also with the extra piece of steel The fit should be nice and tight.

Thanks for all the help!

Sent from my DROIDX using Tapatalk 2
 

Hunner

Well-Known Member
Messages
2,334
Location
Arkansas
OK this "ratchere" is funny.
Sometimes if I go to bed thinking about a problem I wake up with some solutions. I got to thinking that cut off sleeve piece is too narrow. It might not seat well.
Sooo you are unofficially now recruited as a Hunner test technician.
On the left the piece of bushing/sleeve
Next a piece of a metal fence post clamp to hold boards to the pole. I removed the bracket and bolts. Galvanized so it won't rust!
Next is a Ridgid 2" electrical conduit strap clamp.
the last one is thinner and might be all you need. It has a strengthening rib down the back side but I think if you torque down those bolts it will press hard on that.
You should be able to loosen the bolts just enough to slide that in.
I still think the squeezing the clamp AND grinding the back side of the clamp at the bolt holes is the most secure way with no chance of something sliding out.
Squeezed one top right.
I have not tested these fixes but you can and report back.
Huh?
I'm sending you all three pieces but I vote for the wider ones instead of the skinny piece.
DAH_6947.jpg

DAH_6950.jpg
 
Last edited:

H3slate

Brush raked
Messages
983
Location
Tualatin, Oregon
I think the package came today, but it must be jammed in my mailbox, because I can't open it with the key. :gaah:

Will try to get it open, want to work on that bracket tonight.
 

Hunner

Well-Known Member
Messages
2,334
Location
Arkansas
I hope it's cooler up there than here!
I have all my front end stuff off doing some painting and checking things out and I think it will be too hot to paint until tonight.
I checked my sleeve/bushing and it still is tight.
If you tear up that mail box it's a federal offense, lol it was a small flat rate box.
It would still be a good idea to grind on the back of the bracket some.
Squeezing the bracket gets it to conform and touch more of the sleeve/bushing.
Hope you can get it done.
 

H3slate

Brush raked
Messages
983
Location
Tualatin, Oregon
Ok, so after some banging and jiggling, I got my mailbox door open! Thanks for all the parts for troubleshooting Hunner!!

So I took the bracket off and put it in the vise and clamped it down around the sleeve. I also grinded the tab off the end of the bracket. The bracket was a much tighter fit on the sides of the rack, but there was still a little air space at the top. Tested it and had some side to side movement. The rack was not pushing away from the crossmember like it was with the rubber bushing.

Undid the bolts and backed up the bracket a little and fit the spring steel in at the top. Clamped the bracket back down, much harder to do this time. Tested it again, and still have a little side to side movement.

I feel like the bracket is doing it's job of holding the rack against the crossmember, it was not meant to prevent side to side movement. I can see movement on the other side of the rack, I think that this is the bigger problem, that the two bushings on the drivers side have worn out and are allowing the play in the rack. Both bolt are super tight.

I think I know the answer to this, but if I wanted to replace these bushings, I would need to get a new steering rack? Looks like I should have picked up one of the racks on fleabay recently.

Thanks for all the help Hunner, you definitely went above and beyond to help me out and I still believe in your product as a good solution.
 

Hunner

Well-Known Member
Messages
2,334
Location
Arkansas
That did not look like much. Was that with it jacked up or on the ground? When on the ground I have noticed it puts some leverage on components and could tighten up some. How was the steering when driving compared to before?
Yea if you have movement on the drivers side with those two bushings it's probably because when the original rubber bushing on the pass side wore out it put stress on those. Glad it did not break the rack.
I don't know if someone could press those out and insert new ones or not. Unless the metal sleeve in the center is worn I would think the rubber would show signs of tearing are separating.
Interesting combination of problems. It looks like maybe now that slack is allowing the rack to force some movement at the sleeve.
If you stopped all movement at the sleeve then it seems when you steer the other end would move some causing some sloppy steering wheel movement.
Hope you can figure it out, or get a rack and keep that one for a spare.
Until then now that you are an expert at it, stick that wider middle piece in there instead of the small one and see if that helps for now.
Or you could install a center bracket but if those bushings are shot it could still move at that end or it could bind it up with the combination and stop it from moving.
Congrats on the calendar picture. I can see how you may have worn the mounts!
That's what these things are for, right?
_DSC8158.jpg
 
Last edited:

H3slate

Brush raked
Messages
983
Location
Tualatin, Oregon
The movement was with the wheels on the ground. Steering feels ok, not any better though. I am trying to decide if it is the rack or the tires. It's hard to describe, but it just doesn't feel as solid as I remember it. On paved roads it wants to grab to one side, on freeways it feels like just the slightest float at dead center. Will see how it does tomorrow on the trails. Then will get back under the truck and check the bracket.
 

Hunner

Well-Known Member
Messages
2,334
Location
Arkansas
You know another factor in the mix can be ball joints and a-arm bushings. Heavy and frequent off roading is obviously taking it's toll on our front suspension and we need to do all of these things combined to keep it tight.
I just had my old 95 Dodge Cummins up on the rack because it was wandering. I don't drive it much and after driving the H3 with tight steering it was very noticeable.
That ended up being upper and lower ball joints, pitman and drag link, ha ha geeze I rebuilt the whole thing. 235,000 miles
The stock stuff did not have grease zerts but the Moog I put in do. Same issue with ours on the H3.
However now drives out great.
I have wanted modded a-arms for years since back when I did had the tie rods made but never had anyone to do it.
Hopefully now that might get done so we can tweak the components without replacing the whole assembly.
You sound like you are "tuned" to your rig and can diagnose those changes in the steering so stay with it.
It's just nuts and bolts!
Let me know if I can help.
 
Last edited:

H3slate

Brush raked
Messages
983
Location
Tualatin, Oregon
I suspect at least one of my upper a-arms needs to be replaced. I have had an alignment issue that I wanted to blame on Firestone, but think it is the a-arm. On the driver's front tire I have extra wear on the outside edge of the tire. This has stayed consistent through 3 alignments. I have been rotating the tires a lot to prevent too much wear.

I am patiently waiting to see what Duane comes up with for a replacement a-arm before I bit the bullet on an oem replacement.
 

H3slate

Brush raked
Messages
983
Location
Tualatin, Oregon
steering is the same. Haven't gone back under my truck to make any adjustments and still need to order a new rack.

Sent from my DROIDX using Tapatalk 2
 

atvspeed4

Well-Known Member
Messages
1,211
Location
massachusetts
So with this mod is a rubber bushing still used with the sleeve encapsulating it as a spacer? I am working through an idea for the steering rack issue...
 

Hunner

Well-Known Member
Messages
2,334
Location
Arkansas
I chunked the rubber junk.
I got many miles on two different H3's that I got the bracket tight by being persistent.
Metal on metal, no rubber to move or get destroyed. It has worked that way for me.
Other than lowering the rack and all that is involved and the results this was the only easy fix I came up with. The next step was the center bracket.
How is that tie rod replacement progressing?
 
Last edited:

atvspeed4

Well-Known Member
Messages
1,211
Location
massachusetts
The company we are working with is making us crazy. They have such a great product that they have grown too fast and cannot keep up with their orders. We are giving them our weekly call tomorrow to touch bases again. I am looking into two different approaches. I was looking at a silverado 1500 2wd prerunner that used the stock rack with a brace that spanned from one half of the rack to the other tying them together to prevent snapping. They also hard mounted the rack to the frame. I was looking into a way to build such a brace for our racks. I also am looking deeper into swapping a fullsize rack into our rigs. It doesn't look to be as bad as I originally thought.
 

Hunner

Well-Known Member
Messages
2,334
Location
Arkansas
I can fully relate to that. That is why when Randy at Bulletproof agreed to work with me on fitting them to the H3 I jumped on it and made it happen.
Same deal on the skids, as you have run into. The place took on too much work all at once and ran off their staple of small customers that got them where they are.
If the big guys pull the plug as often happens, then what?
Well the rack fix using available OEM clamps and some modding seems to be working but there is room for improvement in most anything.
Mod on!!
 

Hunner

Well-Known Member
Messages
2,334
Location
Arkansas
Rack sleeve up date.
They are finally going to hardening Friday and will ship Monday.
Anybody other than those on this thread or have pmed me wanting these speak up now.
I could add to the order before Friday if I need to.
I have 30 coming as of this order.
Thanks
be careful out there!
 
Top