• Welcome to H4O! For a reduced ad experience, please login or register with the forum.

HUNNER EXtreme Steering Rack Sleeves

Steve #1

Well-Known Member
Messages
534
Location
TEXAS
Worked on it more today and think I made progress (time will tell). I took a hair of material off the bushing where it was cut which stopped the bushing from moving on the bracket but the shaft was still moving in the bushing. I used a section of inner tube that I attached to the inside of the bushing with some insanely sticky glue stuff that my buddy had in his tool box. There is still a very small amount of movement (1-2mm) but it is completely lateral and considering the original design I would consider it acceptable. I no longer have slop in the steering wheel while driving on the highway. I'm going to keep a very close eye on the inner tube to make sure it stays put.

BTW: I realized this week that the one I needed to send back to you never made it to the post office. Very sorry about that. I'll get it on its way to you Monday morning.
 

Hunner

Well-Known Member
Messages
2,334
Location
Arkansas
I was cutting each one and fitting them to my extra rack. I tried to grind where they were cut until that had a slight gap so they could be compressed better. Hope you got that worked out. Other than that I did a bit of grinding on the backside of the bracket. It's definitely beginning to look like there are slight variations depending on how worn the bracket and rack tube were.
I thought about the rubber but was concerned it too might squeese out. I think the bracket grinding for me was the best.
Funny you mention that set that was offset. I was out in the shop working on my bumper design and opened the wrench drawer and there was the other set.
I thought that was the one you sent and there was still one more. Now I'm know I'm only loosing part of my mind.
It's great to have back that new feeling of solid steering, Huh?
I think some people get used to it gradually and just live with it.
Every since I broke a steering shaft on a Nader special, (corvair) in a tight sweeping turn and did more donuts than I could count at 80 miles an hour I have always tried to be very cautious of any steering that does not feel right. That feeling when the steering wheel spins and nothing happens still haunts me.
The rear engine kept the loops even until I slid down the embankment and hit a mud wall of a field higher than the shoulder. It was raining which helped the spin instead of a roll.
 

Hunner

Well-Known Member
Messages
2,334
Location
Arkansas
Thanks Steve, I got the orphaned pieces back and mated them with their proper halves. So now I have two more available.
I think I have 4 others left out of that batch out in the shop I got discounted for quantity. So I have some if anyone wants to get one for later repair.
 
Last edited:

Hunner

Well-Known Member
Messages
2,334
Location
Arkansas
Good, glad it worked out for you.
The only other thing I might could have done was allow the bushing to touch the frame but have little wings out from that to have more of a surface to contact that area. That would have been more involved and expensive. Since I have run one so many miles on two different H3's it is apparently going to work like it is.
 

Hunner

Well-Known Member
Messages
2,334
Location
Arkansas
Did you have any trouble getting it tight? Be sure and check it because it will be different jacked up and on the ground the amount of leverage applied to the rack.
Depending on which way you check it sometimes it may change whichever way allowed some movement.
Tricky stuff for some people and not for others. I think if depends on how long it was run loose and how much that distorted the bracket.
Do you have the halves top and bottom instead front to back. I have tried it both ways.
Kinda close quarters on that top bolt huh?
 

H32NV

Well-Known Member
Messages
322
Location
Golden, CO
def close quarters. I have them top and bottom yeah. and i epoxied a piece of ripstop nylon webbing into the C bracket and press-fit it onto the steering rack, bolted down tight, no movement now. I took video before and after. you could see the steering rack "jump" up and down without this mod, the bushing was totally worn out!
 

06 H3

a.k.a. "The Jackal"
Messages
9,505
Location
Meridian, ID
my bushing was shot too...I also may have some slack on the other end of the rack too. intermediate shaft? I have talked to hunner about that. When I installed my lift I looked at my rack and it isnt split but its has a small gap...Hopefully you installed this mod before the damage was already done.
 

Hunner

Well-Known Member
Messages
2,334
Location
Arkansas
Ok for you that don't want to try my grinding method, try using this rubber fiber reinforced gasket material. I tried it back when I was figuring this out along with the OEM rubber bushing but that did not work out. The OEM rubber bushing still had too much movement. I got it at an ACE Hardware store and you get three sheets to a package.
I just tried and I can only get one layer on one half of the sleeve and still pull the bracket up flush. I left it wide so it would show up but I would trim it to the width of the sleeve. Then use some contact cement for good measure and glue it to the bracket and sleeve. Squeeze that sucker together and I think that will work. I used a strip of metal as the frame and clamped it until it was flush. I can't rotate it on the rack shaft.
DAH_3791.jpg

However here is a random bracket and bushing set up the same way without the rubber gasket material and I could clamp it tight enough I could not rotate it even using the c-clamp as a lever.
3760.jpg

I still think some of those brackets are not conforming to the sleeve and are not tightening up.
Someone posted they squeezed the bracket ends together some but just enough the holes still line up.
I'm sorry a few of you are having the fitment problem but you just got to get it tight which ever method you use.
When you do it firms up your steering and will hopefully allow an undamaged rack to keep going. It has worked for me as I mentioned combined on the 06 and 08 for over 50,000 miles.
Post up if you come up with some other method if you can't stand the thought of grinding.
I should mention again I prefer the sleeve halves to press together front to back to get the maximum surface area to press on.
 
Last edited:

06 H3

a.k.a. "The Jackal"
Messages
9,505
Location
Meridian, ID
Thanks hunner, I like the gasket idea. I may post up some pics of my rack to see what others think...It may be best to take it off put it in storage and use it as a spare...
 

JR3T

Well-Known Member
Messages
89
Location
CA
I finally got around to installing the sleeve. Mine too was not fully clamped without modification.

Had some paint worn off.

DSC00290.jpg


I had about 1/16" between sleeve and top of clamp when fully tightened.

DSC00300.jpg


DSC00303.jpg


So, I sandwiched a piece of 1/8" stainless steel sheet metal under the rack to create a better clamping force.
Added some JB Weld to keep the spacer in position.

DSC00305.jpg


DSC00318.jpg


Clamp now makes good contact with the sleeve.

DSC00331.jpg


DSC00333.jpg


Thanks for sleeve Hunner. Feels good and solid now.
 
Last edited by a moderator:

06 H3

a.k.a. "The Jackal"
Messages
9,505
Location
Meridian, ID
great minds think alike...lol I did the same thing! I may have some problems though...I didnt JB weld mine to it so there is some slight movement still and it can put an angle to the rack which can cause some stress on the other end. I did the same thing with the same intentions feeling pretty smart too :D then hunner gave me the precaution of it putting the rack at an angle...He said it may cause issues or it may not...hopefully he chimes in here soon.

Btw your sandwich plate looks nicer then mine! :thumbs:
 

JR3T

Well-Known Member
Messages
89
Location
CA
great minds think alike...lol I did the same thing! I may have some problems though...I didnt JB weld mine to it so there is some slight movement still and it can put an angle to the rack which can cause some stress on the other end. I did the same thing with the same intentions feeling pretty smart too :D then hunner gave me the precaution of it putting the rack at an angle...He said it may cause issues or it may not...hopefully he chimes in here soon.

Btw your sandwich plate looks nicer then mine! :thumbs:

I'll keep an eye on it. Hope it doesn't go anywhere.
As for the induced angle, I pondered its ramifications for a moment but decided it's only 1/8" which I think is negligible compared to how much slop was in that rubber bushing. Couldn't think of anything else to hold it in better with the stuff in my garage. Didn't want to put any rubber fiber material in there after seeing how quick my original bushing had slid out from the clamp. I'll have to take some final measurements and see what, if any, difference there is between driver and passengers side gaps.
 

06 H3

a.k.a. "The Jackal"
Messages
9,505
Location
Meridian, ID
Mine is a small thickness too. It may not effect it or it may. Hunner just told me to watch out. Did u jb weld the back to the frame or the sandwich to the sleeve?

How did u get that bend also? I like ur plate better haha

Sent from my DROIDX using Tapatalk
 

JR3T

Well-Known Member
Messages
89
Location
CA
Mine is a small thickness too. It may not effect it or it may. Hunner just told me to watch out. Did u jb weld the back to the frame or the sandwich to the sleeve?

How did u get that bend also? I like ur plate better haha

Sent from my DROIDX using Tapatalk

I just put JB between frame and the spacer, nothing on top of it.
Was a scrap bracket I had. Trimmed it to size.
Hope it holds and nothing shifts. Will find out pretty soon in Moab.
I have another one of the same brackets I could trim down for you, if you need/want one.
PM me an address and I will mail it to you.
 

Hunner

Well-Known Member
Messages
2,334
Location
Arkansas
As you guys that have had you head up in there know, the other end does have two rubber bushings in those mounts. So I think that can take some misalignment without undo force. I don't know for sure I was just being cautious by using a sleeve that was about the same thickness as the rubber bushing on the pass side.
Not moving at the pass side once clamped should help by not transmitting that leverage down to the other end. The brackets do have a weird curve to them but the sleeve will press down to conform to it if you either grind where it touches the frame and lower mounting surface or like JR3T did with the plate. I was just hoping that would not be needed.
Auggie ordered a new bracket. He said his was distorted. I don't have those pics yet. I think I mentioned this before but the longer you run with a boogered up rubber bushing the more all that moves around and leverages on that bracket.
I'm glad to see you guys getting them in there.
_DSC7429.jpg

2280.jpg

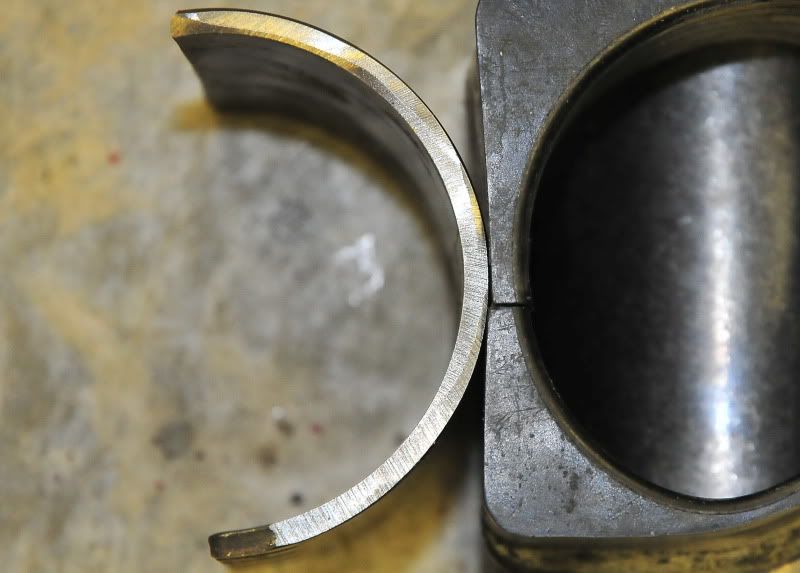
also make sure there is a gap in the two halves on the edge I cut. That will allow it to squeeze onto the tube.
 

Hunner

Well-Known Member
Messages
2,334
Location
Arkansas
quote JR3T
I had about 1/16" between sleeve and top of clamp when fully tightened.
DSC00300.jpg

quote JR3T

That is because the clamp cannot full engage that curve because the clamp was supposed to hold the mushy rubber busing in place with out smashing it, so much for that idea huh?
I think the set up on my 06 worked because since I did not have OEM tie rod boots going as far on the rack, plus I had the old rubber stretchy boots so I was able to get a 3 inch sleeve in between the hydraulic fitting and the end rack nut and slide the boot over all of that.
The Alpha I did the grinding on the bracket until it squeezed the bracket down to close that gap and press the sleeve into the curve of the bracket.
If while you have a bracket off anyone can take the sleeve and tap it into that curve to see it fit. It will try to pop back out because this stuff is spring steel without being held in place against the tube.
I'm glad you guys that are doing it have the ingenuity to fit it properly in your own way.
Mine is in there solid for now. I ran Moab the last time I was out there with that one in there and around here on many trails. I would recommend the more you wheel hard the more you should check it for tightness.
I'm going to order some more so if anyone has a problem let me know so we can fix it. I don't think you can mess up the sleeve!
Mod on!
 

Hunner

Well-Known Member
Messages
2,334
Location
Arkansas
This is another method or at least another way to explain it. If you squeeze the ends of the bracket together more it will conform to the sleeve. I put one over the spare rack and squeezed it with the c clamp then removed it and it stayed in place. The mounting holes are slotted left to right. After doing this it might take a bit of grinding up and down if the holes do not line up properly.
The black between the silver end nut and sleeve is the tube not a gap. I need a different angle on that or more involved lighting. gotta run right now.
DAH_3895.jpg

DAH_3896.jpg

DAH_3899.jpg
 

06 H3

a.k.a. "The Jackal"
Messages
9,505
Location
Meridian, ID
Hunner you also mentioned to me in emails to weld the plate on there? Maybe I just need a new bracket....Mine has 85k miles on it and the rack has seen better days. It isnt seperated like the one pic but definitely has a slight gap...not sure if that gap is normal or not...

Have you ever changed the bushings out on the rack mounts? Mine have some play too. This is one of the things I gotta resolve before moab
 

Hunner

Well-Known Member
Messages
2,334
Location
Arkansas
The bracket was not real high. I have several for research. You could try squeezing it first unless it's twisted.
I have changed racks! lol
you can tighten those two bolts on the driver side and take up some of that movement.
But you should not have that movement you showed me in the steering shaft down from the steering wheel. Did you check on that?
 
Last edited:

06 H3

a.k.a. "The Jackal"
Messages
9,505
Location
Meridian, ID
I havent checked the steering shaft yet...Luckily I have no work tomorrow and I shouldnt have too much homework. Maybe I can check it then
 

Hunner

Well-Known Member
Messages
2,334
Location
Arkansas
I saw what you posted thru the email notice. That was alot of movement laterally. Check the two bolts on the drivers side and make sure they are tight.
I think the pass side bracket is supposed to be more support than preventing movement laterally but it of course does some of both. With as much movement as I saw in that video it almost makes me thing your rack is broken. Hopefully not and if it was the short hydraulic line would have surely broken. Check down where the black tube meets the cast aluminum gear box and make sure there is not a gap.
It would be best if you could squeeze the clamp together some to fit the sleeve better, as I showed in some of the latest posts. That is more easily done with it off the vehicle either with a large vice and or c-clamp. I prefer that method rather than using some sort of shim out of rubber that might get destroyed over time.
Let us know what you come up with.
 
Top