• Welcome to H4O! For a reduced ad experience, please login or register with the forum.

SO.... is there really no way to fix the steering rack issue on the H3?

alrock

El Diablo
Staff member
Messages
10,677
Location
Scottsdale
I'm thinking that my drivers side might have play as we now know the passenger side is firmly clamped. I have rub spots on the frame above the tie rod boots on each side, suggesting that the rack is moving around. I have not taken off the skids yet to get a good luck but I think that is the most logical reason.

I will be carrying a spare rack for Moab (thanks Bigunit)
 

Hunner

Well-Known Member
Messages
2,334
Location
Arkansas
It's a good idea to tighten the drivers side bolts to take up slack from wear. I guess at some point when there is enough wear in the bush the sleeve in that fitting will prevent the bolt from further tightening. If some of you are just now attempting to fix this with say 50,000 to 70,000 miles there could be lots of wear on both sides.
I did this just slightly more than 10,000 miles on the 06 and 08 when I first noticed all the slack and whacking of the rack.
 

Hunner

Well-Known Member
Messages
2,334
Location
Arkansas
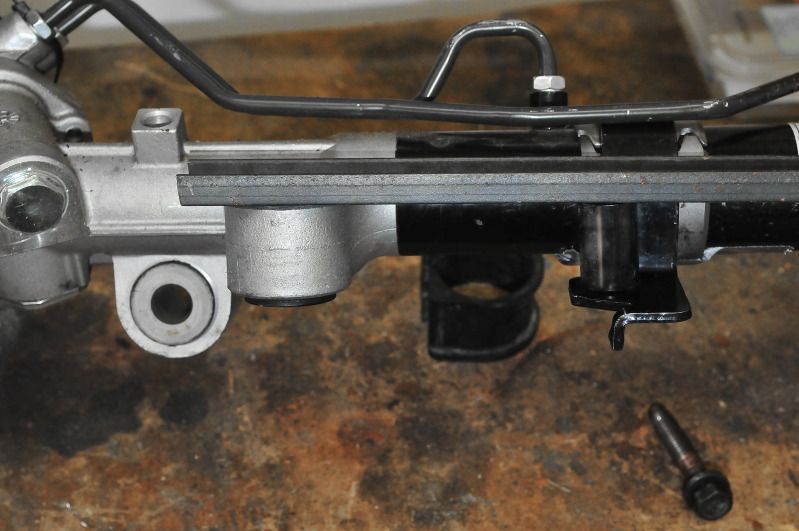
Woke up with this idea. Simple farmer fix approach for now, just blocking it out.
Instead of centering the extra mount move it down to the hydraulic fitting just for good measure and run some channel iron between the rack mount at the aluminum over to a rigid thru bolt and extra clamp. An OEM bush could be used or a metal sleeve for less movement.
I used a 5/8 socket laying around for a spacer to line the two up, since that was what was handy at the time.
I show it set off to the side of the bolt hole showing how it could be connected to the frame cross member just like I did for the center. Huh?? Lined up in the second shot with the hole.
Simple, easy garage fix without welding or special tools, cheaper than a rack! A cave man could do it!
Then either poly bushings or metal spacers in the OEM rack mount point there on the aluminum housing. That may stabilize and prevent if from separating. I don't know but it could still break somehow but would not seperate?
I'm not sure but we might want just some wiggle room to allow for some shock absorption?
DAH_7117_zps417aa5e5.jpg

DAH_7120_zpsc8330f06.jpg


Just had a news flash in my head. Scarry huh?
How many of you that are having problems with keeping things tight, that have not tried grinding the bracket and mating surface, are running 315 tires and have been since your original tires.
 
Last edited:

backcountryislife

Well-Known Member
Messages
858
Location
Dumont, CO
Well... lasted longer than an hour this time!!!!

lasted about 4 hours!

Something is wrong on the driver's side.

After my run today, I was on the gravel road heading out & on a right turn I heard a clunk, stopped & the rack was loose & the sleeves were sitting in the skidplate.

With the sleeves out... the rack is SCARY. I'd really recommend welding the sleeve to the U clamp on the passenger side... it'll hold it better, and if it WERE to come loose, one side welded to the clamp should keep the other one in there.

Felt GREAT the whole way up the harder stuff, had a blast today


SO, does anyone have a diagram of the crossmember/ rack interface? There HAS to be something missing, or something wrong for mine to be moving this much.
 

Hunner

Well-Known Member
Messages
2,334
Location
Arkansas
Either your clamp is not getting tight on the sleeve or something somehow is out of alignment.
I agree welding half the sleeve to the clamp has been something I have thought of doing to keep things in place, but the clamp must be tight on the sleeve anyway for the back half to stay in place. The other option was to weld the other half in place. Then place the rack in there and bolt on the other half. I just never have taken the time to get on a rack and do that. It would have to be precise. Maybe somehow tack it with the clamp in place. Then move the rack to really get a good bead.
That would be more involved for most people but in your case it is worth a shot.
Glad you recovered the sleeve.
 

backcountryislife

Well-Known Member
Messages
858
Location
Dumont, CO
I don't think the problem is on the clamp/ sleeve side. I think something got misplaced on the driver side. I just don't know what should be there though, so I can't do much without getting some kind of diagram. Seem like the bolts should NOT be able to move the amount they are.
 

Hunner

Well-Known Member
Messages
2,334
Location
Arkansas
If you tightened the bolts and the rack still moves then the bushings must be shot, torn away from the center spacer maybe?
That is all there is up in there on that side and the connection to the steering shaft.
Keep investigating and maybe something will show up.
 

Hunner

Well-Known Member
Messages
2,334
Location
Arkansas
Do those ABS inserts maybe prevent the bolts from tightening up all the way to hold the aluminum housing?
If they are too long I could see that being a problem but until you check that we won't know.
It is interesting how after all this time I have been running mine others are just now having this problem.
 

backcountryislife

Well-Known Member
Messages
858
Location
Dumont, CO
Do those ABS inserts maybe prevent the bolts from tightening up all the way to hold the aluminum housing?
If they are too long I could see that being a problem but until you check that we won't know.
It is interesting how after all this time I have been running mine others are just now having this problem.

Took them out thinking that was the problem... it was more solid with them in, until it came loose, but this time it was the stock bushings... so something else going on.

The bolts are able to move about an inch on the rack side of the crossmember... that just doesn't seem like it should be possible.

viewer


The bolt head is staying in one place & the nut end (rack side) is swinging from one side to the other. Like there's something missing.


Anybody with a Rancho setup got a stock crossmember sitting they could get a pic of?
 

Hunner

Well-Known Member
Messages
2,334
Location
Arkansas
I don't see your image.
Here is a shot I had of the whole area if that helps.
8093_zps3a20c545.jpg

I guess I forgot in all this you had a Rancho lift.
I have not seen a close up of that changed cross member and would like to see that.
I guess you have the raised knuckles also?? just asking. So you should have near stock angle on the tie rods?
 
Last edited:

Hunner

Well-Known Member
Messages
2,334
Location
Arkansas
I looked back at the posts in my thread on this but since this one is most active I wanted to point out again, if you put 1/2 the sleeve in the bracket with it out of the vehicle, then put that in a vise and squeeze on the rounded part of the bracket you can get it to conform better to start with. I don't know how to explain that any better. I also suggested if you slightly over do that and the holes are off a bit try grinding out the lower hole as it has more bracket around it, just enough to allow you to line it up easier.
I'm going to go weld half of one 2 inch sleeeve on a bracket so I can see what that does for holding things together, as an option to grinding.
I still think squeezing, grinding, add neoprene and welding for hardcore fix along with flex lines and off center extra bracket with brace to drivers side bolt would be the culmination of all things to do the most reinforcing.
DAH_7131.jpg
 
Last edited:

backcountryislife

Well-Known Member
Messages
858
Location
Dumont, CO
I don't have a rancho setup, but what I need to see is on the top or the side WITHOUT the rack, and I thought someone with a rancho setup might have one sitting where I could see the part of the rack without having to pull the thing off. I need to see what is wrong with mine, and I can't tell without seeing another one.
 

Hunner

Well-Known Member
Messages
2,334
Location
Arkansas
Ok I see what you mean now. I just been out there looking and there is no mystery parts on top that I can feel on the cross member.
I thought I had missed some info. We do have a few posts about this, lol
Hope someone can help.
I will try to stay with this and help anyway I can.

I did want to ask if you bought this H3 new or if not, if it had any damage to the front end to the frame?
 
Last edited:

backcountryislife

Well-Known Member
Messages
858
Location
Dumont, CO
Ok I see what you mean now. I just been out there looking and there is no mystery parts on top that I can feel on the cross member.
I thought I had missed some info. We do have a few posts about this, lol
Hope someone can help.
I will try to stay with this and help anyway I can.

I did want to ask if you bought this H3 new or if not, if it had any damage to the front end to the frame?


Used, clean carfax, no accidents, and nothing that looks like damage (I used to help rebuild cars, so pretty comfortable looking for issues in general)


Not really talking about any extra parts, I'm just talking about how the bolt holes on the rack side of the crossmember should look. You wouldn't be able to see what I'm looking for without removing the rack. I've never seen a unit that should hold something solid have a tight bolt hole on one side... and a 1" open gap on the other.

I'll pull it apart tomorrow probably & take some pics.
 

06 H3

a.k.a. "The Jackal"
Messages
9,506
Location
Meridian, ID
It would be crazy if all this time the problem was defective crossmember. Granted the rack is still weak but a defective part just amplifies the issue.
 

backcountryislife

Well-Known Member
Messages
858
Location
Dumont, CO
Up until these last two times I've never had the driver's side move before... this is something very different. The last two before the loose rack issues were nice & tight on that side.

I feel like somehow something got screwed up in the 2nd to last install.
 

Hunner

Well-Known Member
Messages
2,334
Location
Arkansas
Ok, besides your issues I wanted to add this about the other end. I will look for images of the crossmember when I had my rack out. If you do go in and remove the rack most defiantly get us some pictures.

I want to try to make this clear again, for anyone, put 1/2 the sleeve in the bracket with it out of the vehicle, then put that in a vise and squeeze on the rounded part of the bracket you can get it to conform better to start with. I don't know how to explain that any better. I also suggested if you slightly over do that and the holes are off a bit try grinding out the lower hole as it has more bracket around it, just enough to allow you to line it up easier.
I'm going to go weld half of one 2 inch sleeeve on a bracket so I can see what that does for holding things together, as an option to grinding.
I still think squeezing, grinding, add neoprene and welding for hardcore fix along with flex lines and off center extra bracket with brace to drivers side bolt would be the culmination of all things to do the most reinforcing.
It has become obvious some people are just slapping the sleeve in there and not grinding or using the option of neoprene and that just won't cut it. The clamp has to be tight on the sleeve both with wheels on the ground and jacked up at full droop.
DAH_7131.jpg

Got some work done.
DAH_7126.jpg

DAH_7129.jpg

Maybe tonight or tomorrow get it installed.
 
Last edited:

Hunner

Well-Known Member
Messages
2,334
Location
Arkansas
I and others cannot wait either is why I'm trying this for now. I am going over all my mods to get poised for a fall trip, of yet to be determined destination!
 

08H3

Well-Known Member
Messages
1,370
Location
United States
This is addressed more towards Hunner, but I'll throw it out there for everyone. I'm not really sure what welding the half sleeve to the strap is really going to accomplish unless you have a fitment issue like I did. The only reason I welded mine is because since I was using only one half of the sleeve, it's no longer captive. That's the only reason I welded mine-- so it wouldn't fall out. It doesn't cause it to tighten up any more.
 
Top