• Welcome to H4O! For a reduced ad experience, please login or register with the forum.

HUNNER EXtreme Steering Rack Sleeves

Hunner

Well-Known Member
Messages
2,334
Location
Arkansas
Glad to get a report and pictures. I was concerned there could be a variable on how far on the rack those stock tie rod boots were. Does not move now does it??
I guess just my Alpha needed grinding. I mentioned before I did not have to on my 06 I-5. Don't know why that was that way.
I have noticed when I put the bracket on it is tight at first at the top and bottom but after the ends go over the curve it seats down on the bushing on mine.
Now go play and test it. Check it after doing some flexing and make sure it stayed tight. Did you have the wheels off the ground when you installed it? That seems to be when I could move things around the most with the rubber bushing in there. On the ground it puts force on the bracket and it is hard to get it to move unless actually driving over bumps. Which is why it is hard to diagnose.
Good Job!
 
Last edited:

5gn-h3t

Well-Known Member
Messages
616
Location
Northeast Pennsyltucky
I installed it with the wheels on the ground. Then I jacked up the passenger side and shook the hell out of the wheel. The rack didn't move a bit. However, the tie rod did. I think the inner tie rod on the passenger side has some play in it.

My review:
Installing the sleeve was easier than trying to get a stock bushing back in there.
There is absolutely no movement in the rack.
The steel sleeve cost less than the trip to the former Hummer dealer. (90 miles each way at 15mpg)
It will last much longer than the rubber bushing.
I notice no increase in vibration or cabin noise with the steel sleeve compared to the rubber bushing.
:thumbs::thumbs:
 

Hunner

Well-Known Member
Messages
2,334
Location
Arkansas
Again thanks for sharing your install experience with us all.
If you don't have a spare tie rod to look at here is all there is at that end.
_DSC6486.jpg

That end shaft before the ball is the same size on both the 14mm and 16mm. There could be slight movement of the rack inside the tube there at the end. There is a seal at the end also. I have seen reports of people having that leak and the tie rod boot gets fluid in it. Only way to find out what is moving would be to remove the boot to check the tie rod end. You do carry spares, right? Like I have said many times the more your torsions are cranked up and resulting tie rod angle increase the more they push up instead of in and out.
Heavier bigger tires and wheels add to the stress knocking things around.
Some of the movement could also be from upper a-arm bushings. This is a video but it does not seem to sync sound and is slow to respond. Maybe I need to build a new computer next?

I also improved the next thing in line.
BP7100.jpg

but that's a whole nuther story...........................
 
Last edited:

alrock

El Diablo
Staff member
Messages
10,674
Location
Scottsdale
Got my sleeve - and the two halves match. Now, I just need some guy from Arkansas to come out here with his toolbox . . .
 

5gn-h3t

Well-Known Member
Messages
616
Location
Northeast Pennsyltucky
Well, I wanted to test the steering.

I ended up testing the CV shafts.
The passenger side moves more than a box of cracker jack.:gaah:

I'll post some pics tomorrow.

If you have an H3 CV shaft, PM me.
 

Hunner

Well-Known Member
Messages
2,334
Location
Arkansas
Got my sleeve - and the two halves match. Now, I just need some guy from Arkansas to come out here with his toolbox . . .
I got a feeling there is another mis-match out there somewhere. Maybe they will both come home to be re-united. I'm paying return shipping.
I would like very much to head out west but if I do I will probably take the more northern route. I hate I-40. There are three of you out that way with the sleeves, you need to have an install party.:shifty:
 

Hunner

Well-Known Member
Messages
2,334
Location
Arkansas
Well, I wanted to test the steering.

I ended up testing the CV shafts.
The passenger side moves more than a box of cracker jack.:gaah:

I'll post some pics tomorrow.


If you have an H3 CV shaft, PM me.

Have you been running that turbo?
That CV shaft is going to be a bit more involved.
DAH_4858-1.jpg
 
Last edited:

Steve #1

Well-Known Member
Messages
534
Location
TEXAS
Mine showed up late Sat and I tossed it in the back of the truck and was to busy Sun. My wife has prety much stolen the 3 from me but I'll try to catch up with it and see if my halfs match.
 

08H3

Well-Known Member
Messages
1,370
Location
United States
First, I need to emphasize that my experience is NOT a problem, defect, or any way attributable to Hunner's sleeve. That said, I'll also admit that I did not read every single post thoroughly in this thread, so it may already have been addressed.

I pulled my bushing out and put in Hunner's sleeve and had a huge amount of play. I installed it tooth down as Hunner described, so rotated it 180 to make sure the back side was not touching. It was touching, so I thought I found the problem, took off just a little material and reinstalled. No dice. Still tons of play.

Backing up a couple months, I had put in a brand new OEM rubber bushing and had play, I was hoping Hunner's mod would fix it, but no such luck. I'm certain that what has happened is 75,000 miles of midwest winters, wheeling, and other mud and muck thrown up there has actually worn the outside diamater of the rack down to where there isn't going to be a correct fix short of a new rack of makng a custom undersized bushing. No time for that right now, so I went back to my shim method I used on the rubber bushing. As has been pointed out, you need to be careful not to throw the rack out of line and put lateral stress on it. You're only shimming it to the point that you're making up for the wear. In my case, it was 2 shims that I had laying around from a starter (sorry, no mics handy, so I can't give you the thickness). Place those between the crossmember and the sleeve, making sure it doesn't go behind the retaining bracket, or you'll defeat the purpose. This tightened up everything for me....for now. I've been shimming the rubber busing for 30,000 miles now in one form or another, so hopefully this will last a while too.
 

Hunner

Well-Known Member
Messages
2,334
Location
Arkansas
The backside of my bushing SHOULD touch and the bracket should compress it against the frame. If it does not, grind the bracket or lower welded nut until it does.
that will be an interesting picture at some point to see that worn rack. Even more reason to replace it BEFORE you have lots of movement.
Posted from Lander Wyoming just 4 hours from Yellowstone, I'm going to make it this time, got chains??
Keep us posted and let me know if I can add any info.
 
Last edited:

Hunner

Well-Known Member
Messages
2,334
Location
Arkansas
This first rack was the one on my 06 that broke. There is more wear there than just paint.
The second one is off the Alpha with about 30,000 on it. It must have been loose for awhile.
This second one also shows that welded in nut at the bottom. On mine the upper edge of that was raised higher than the lower portion and kept the bracket from sitting flat.
7430.jpg

9934wear.jpg

It appears to me the way they come the bracket does not fit tight around the rubber bushing to start with. Then miles and cranking the t-bars which causes more upward force from the tie rods and bigger tires and the way we use these, to use a country term, "wallars out" the bushing and rack tube.
 
Last edited:

Hunner

Well-Known Member
Messages
2,334
Location
Arkansas
HUNNER, I have a mis-matched set just the opposite of yours. :woot:

TADAAY! there it is. I have one on the way. I missed this while I was gone. PMed ya.
Sorry bout that. Now I owe you a brusky or 3 in Galveston on the beach. :shifty:
I will also refund your first $5.20 shipping.:thumbs:
 
Last edited:

kd7irm

Regular Guy
Messages
175
Location
Bagdad, Az
Hey Hunner, sorry I haven't been on in a while but I did get all the stuff, skids and sleeve. Thank you! Very solid quality stuff, looks like it is built to last a lifetime.

Now to get it all installed on the 3.....


Sent from my DROIDX using Tapatalk
 

Bigunit

Hammer Down!
Staff member
Messages
6,561
Location
Arizona
Wes, if you want to make a trip down to Tucson, I'll help you get everything on. I have all the tools we'll need except a welder for the front leaf spring mount skids , but we can take it to my friend's shop (he's the guy who's been on Monster Garage) & he'll weld those on for you real quick.
 

kd7irm

Regular Guy
Messages
175
Location
Bagdad, Az
Wes, if you want to make a trip down to Tucson, I'll help you get everything on. I have all the tools we'll need except a welder for the front leaf spring mount skids , but we can take it to my friend's shop (he's the guy who's been on Monster Garage) & he'll weld those on for you real quick.

Big that would be freaking awesome! If you are serious, it would be well worth the drive to Tucson! Maybe I could swing by and kidnap alex on the way, lol.

Sent from my DROIDX using Tapatalk
 

Bigunit

Hammer Down!
Staff member
Messages
6,561
Location
Arizona
Yep, I'm serious & I'm sure that Alex would gladly jump in your rig or follow you in his. Since now that we have a plan, let's figure out when! This weekend will be tight because I have to attend the UofA game & a big tailgate party on Saturday (it's homecoming weekend). Once we get all that stuff on & asuming we have some time, we'll take it on a local trail & test everything out! :thumbs:
 

kd7irm

Regular Guy
Messages
175
Location
Bagdad, Az
Cool, sounds good! I will pick up some paint and rattle can them this weekend :) let me know if the next weekend would work for ya or maybe a weekday.
Sent from my DROIDX using Tapatalk
 

Hunner

Well-Known Member
Messages
2,334
Location
Arkansas
Just a bump for these. I still have 10 or so left. I need to cut and blast the rest of them but they will be ready to go in a days notice.
Thanks
 

Hunner

Well-Known Member
Messages
2,334
Location
Arkansas
Just a note;
I have 3 full sets of skids left from the last batch and some steering rack sleeve/bushings.
Set of skids still $165 shipped on this batch. The sleeve/bushing is $40 shipped or
when bought and shipped together are $200 shipped for both.
Not sure what price they will hit me up for next time, probably next year now.:huh:
 

Steve #1

Well-Known Member
Messages
534
Location
TEXAS


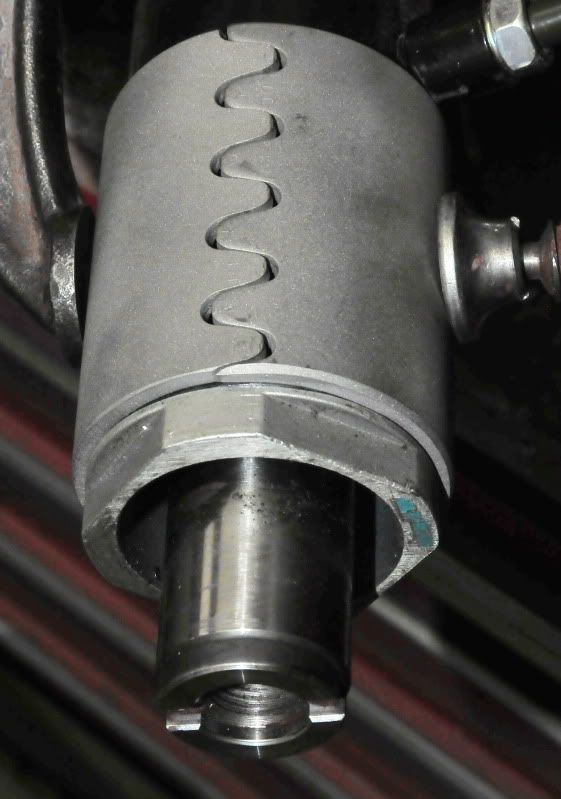
Is this how it should look when tightened down all the way? Mine looks like that but im still getting some movement inside and outside the bushing. This is still after I ground down the bracket and the mounting point.

The bracket and the cylinder both had ware on them when I took it apart.

I've been up for the past 23 hours and working on this for the past 9. Any advice would be appreciated (other than to put it to bed for the night because that's what I'm about to do :) ).
 

Hunner

Well-Known Member
Messages
2,334
Location
Arkansas
All I know to tell you is when you get the bracket so that it will squeeze the sleeve tight you should not be able to move the sleeve. Sorry you are having trouble. I stuck the one in my 06 and it just worked. On the Alpha I had to grind on the bracket and mounting point.
I can't figure out how to describe that bracket.
It looked like it was supposed to dip down on the back side of the rack right where the heal of the bend is before the mounting hole. Like wrap around a bit. That heal area is where I ground on mine to allow it to pull down the sleeve tight. I know it can be tough to get in there the first time. I finally have it down now.
If it is squeezed together out at the ends of the area where the holes are that will make it pucker out at the rounded area instead of pushing on the sleeve.
That picture you posted is how the teeth should come together. That is the 3 inch one I used for awhile with the BP tie rods. It comes out to that end nut on the rack. The 2 inch ones are back from the end an inch to let the OEM tie rod boot slip over to the end of it but not over it. That was what I figured out because the old boots were rubber and would go over it but the new replacement boots I got from the dealer to check it out were hard, not pliable, like pvc or something and would not go over the sleeve. So now there is an inch to have room for the boots. Let make it clear though you do not have to remove the OEM tie rod boot to get the sleeve on.
Yeah maybe sleep, and look at it next year?
Happy New Year anyway and let me know if you have any more problems.
 
Top